Over the years, my homelab has expanded and contracted multiple times. As I am heavy into automation now and downsizing a bit, it was time to fully ditch VMWare.
Introduction
For some reason, it seems I am never happy with my lab. For years now, I’ve constantly tore it up, started from scratch, migrated, migrated back, and more. Up until recently, I had ESXi, Proxmox, libvirt, and even some HyperV in another VM for testing. All these systems played different roles, even if they are just for learning.
By far, I’ve been running ESXi+vCenter the longest, and it would be considered my “primary” cluster. When you have multiple hosts, heavy networking with stuff like vDS, want HA (high availability), it’s hard to argue that the vSphere suite doesn’t automate it and make it somewhat painless.
But now things have changed. I’m looking to combine and contract my lab, and more tightly integrate LXD/C and automation. I decided it was time to complete the migration completely away from VMWare products, especially since I’ve already sold/powered down/eliminated 3 out of the original 5 hosts in my cluster.
Don’t get me wrong, with VMUG, VMWare is great and affordable, but I’m more interested in automation now than I am with HA, so a single host or two with a ton of CPU and RAM is a better fit.

Automation
Automation has always been something that has been near and dear to my heart. Put quite frankly, manually installing VMs, configuring to my liking, realizing I messed something up and starting over, is absolutely not fun.
I’ve also focused heavily on making all my VMs “pure compute”. This means something like Ansible or Docker, with all data stored on an NFS share or iSCSI export. The end result is being able completely nuke a VM, hit a button, and have it back up and running exactly where it left off within a few minutes. It also means you don’t need to back up individual VMs, just a few basic text files, the main NAS, etc. I’ve talked about some pieces of how I accomplish this in an older post here. I just now deploy a similar config with Ansible.
Prior Automation
I’ve actually done a lot of automation in the past. Chef, Salt, but my first serious implementation was Foreman + Puppet.
Does Foreman work? Absolutely. It gives you the ability to automatically create and deploy fresh VMs with PXE and Puppet. Is Foreman nice to use? Absolutely not. It’s just an absolute disaster to set up and maintain. And forget trying to upgrade even minor versions. I was religious about regularly snapshotting and backing up that Foreman virtual machine because usually an upgrade would require me to completely start from scratch.
Current Automation
For at least a year now, my main automation has been a combination of Terraform and Ansible. Terraform talked to the vCenter API and cloned “gold master” VMs, and Ansible configured them to my liking. I also have MAAS integrated for deploying the bare metal hosts, but that’s beyond the scope of this post.
This really has been a great solution, but I dislike needing to use “gold master” VMs, since they are something that I have to go back and renew and update every once in a while. And like mentioned, I’m really wanting to get away from VMWare completely.
So I killed one of my ESXi hosts, and fired up Ubuntu.
The Hypervisor
Since this post will probably end up getting pretty long and with lots of code examples, I don’t want to waste too much time on describing the host setup. But I’ll try and give the important pieces:
- Ubuntu 20.04 Server. Why Ubuntu? Mostly because the driver support isn’t horrible. At the time of this writing, I tried 20.10, but the communication between 20.10 virtio guest tools and Terraform is broken.
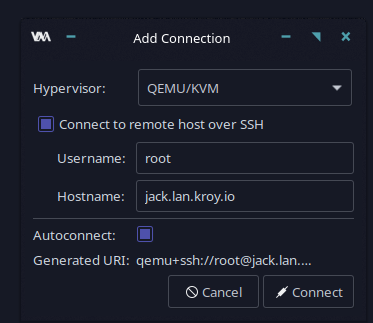
- Setting up SSH key auth. If you are using virsh, virt-manager remotely, it’s easiest to use SSH to communicate with libvirt. Also, I store all my terraform configs on my workstation and terraform and ansible communicates via SSH.
- Installing libvirt and other important stuff .
sudo apt install qemu-kvm libvirt-daemon-system libvirt-clients bridge-utils- Installing Network Manager. On my hypervisors, I trunk everything, so nmcli is just a WAAAAY easier method of configuring a bunch of bridges. I’ve provided working examples of my configuration of the
/etc/NetworkManager/system-connectionsdirectory in a github repo.- Note that the main interface (the slave), the main bridge (vmbr0), and the VLAN5 bridge all have the MTU set to 9000. I use VLAN5 as my storage network, and this setup allows me to easily pass a 9000 MTU link into a VM.
- Installing Network Manager requires you to change netplan and re-configure your networking. The changing of Netplan involves removing the existing
yamlfile, creating a new one that looks like this example from github, and doing asudo netplan apply.
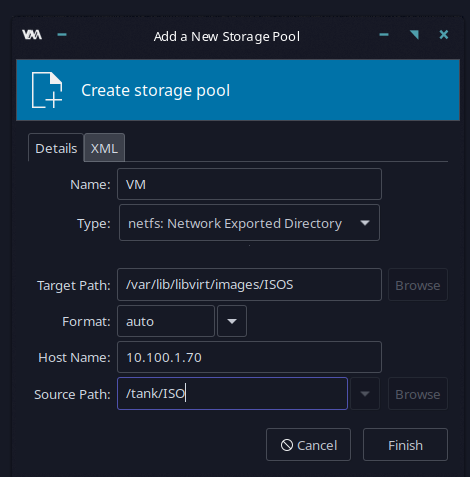
- Both my central ISO storage and main VM storage happen via NFS. So with Ubuntu, first I need to
sudo apt install nfs-common, and then add them as storage pools.- Even on systems without selinux, libvirt enforces it. So if you add a new storage pool and get weird errors like “permission denied”, adding
security_driver = "none"to your/etc/libvirt/qemu.conffile and restarting libvirt is a quick fix, though probably not the best fix from a security perspective.
- This is easiest done with
virt-manageron your local PC, and then connecting via SSH to the libvirt host. Then just add pools
- Even on systems without selinux, libvirt enforces it. So if you add a new storage pool and get weird errors like “permission denied”, adding

Terraform/Grunt
The two main tools I want to talk about here are terraform and terragrunt. A layperson’s definition of terraform is to define “infrastructure as code”. That means, instead of clicking buttons to make a VM, choosing the amount of RAM, etc, you define it in the terraform domain specific language or DSL outlined here. With terraform, you create a directory and put text files in it that define resources.
Of course that’s a pretty dry definition, so all the examples that follow will outline how all this fits together.
terragrunt is just a minor wrapper to terraform that extends it in a few nice ways. You can drop different projects in different folders and apply changes to all or none, plus have pre/post hooks to run things. I’ll have examples of this as well.
It’s very important to note that ALLLL terraform is concerned with is state. If something is out of state, it does its best to non-destructively move it, but that depends on the module you are using.
Most of the time it’s just as happy to just delete everything and start over. Plans and applies will inform/warn you, but it’s really easy to get cocky and purge some data.
Keep that in mind as you begin your terraform journey.
All of this is just happening on my local Linux workstation. As terragrunt and terraform are both just Go programs, that means to install them you just download and run.
Install Terraform
With terraform, there were some MAJOR changes in the .13 version, and that’s the version I’ll be using. Something like this can be used to install it on Linux:
wget https://releases.hashicorp.com/terraform/0.13.5/terraform_0.13.5_linux_amd64.zip | unzip terraform_0.13.5_linux_amd64.zip && sudo mv terraform /usr/local/bin && rm terraform_0.13.5_linux_amd64.zip 
Similar methodology can be used to install terragrunt
Basic Layout
As mentioned, I’m doing all this on my Linux workstation. This will later allow me to easily shove this all into a git repo, make available from anywhere, etc.
Note that I’m not trying to make a comprehensive terraform guide here.
So I probably won’t be touching much on stuff like .tfvars files, which act sort of like env files, and things will be overly verbose so as to demonstrate what I’m doing.
There are plenty of opportunities for code reuse and further templating. Also, you can lay things out however you like. There’s not really any specific rules on how things need to be mapped out
Lets look at the basic layout for my infra:
❯ terraformroot
├── diskimages
│   └── focal-server-cloudimg-amd64.img
├── terragrunt.hcl
└── vms
    └── terragrunt.hcl

3 directories, 3 files
This layout leverages the best of terraform and terragrunt. It allows me to separate out different types of resources (VMs, and in the future LXC and networking), and access them separately (with normal terraform), or globally (with terragrunt).
The base directory terragrunt.hcl file is just empty. It’s just a placeholder to allow you to use terragrunt from that level, meaning everything below it, like in vms would work on a terragrunt apply-all.
I also have a diskimages directory with the Ubuntu 20.04 cloud-init enabled image, found at this link. You can download this from Ubuntu every time, but it’s much quicker to store a copy locally and just use that, plus you are being a better netizen.
The vmsdirectory terragrunt.hcl contains a “post hook”. This updates my DNS via a script whenever VMs are added, updated, or deleted. This is a file that you may or may not need and may want to remove or skip creating.
Setting up a VM
Let’s start by creating a simple VM.
The first layout we are working on ends up looking like this:
vms
├── terragrunt.hcl
└── testvm.lan.kroy.io
    ├── cloud_init.cfg
    ├── global.tf
    ├── network_config.cfg
    ├── terragrunt.hcl
    └── vm.tf

1 directory, 6 files
Here I’ve created a directory named after the destination VM for organization, and put the files main.tf and terragrunt.hcl in it.
You can name the actual terraform files whatever you want as long as it ends with .tf, but they are processed in alphabetical order. Usually this won’t make too much of a difference, but in some scenarios it can.
The Config Files
- The first file is the
global.tf. This defines some of the basic pieces of our resource.
 terraform {
    required_version = ">= 0.13"
    required_providers {
        libvirt = {
            source  = "dmacvicar/libvirt"
            version = "0.6.2"
        }
        mikrotik = {
          source = "ddelnano/mikrotik"
          version = "0.3.6"
        }
    }
}

# instance the providers

provider "libvirt" {
    uri = "qemu+ssh://[email protected]/system"
}

provider "mikrotik" {
    host = "crs354.lan.kroy.io:8728"
    username = "admin"
    password = ""
}

resource "libvirt_volume" "os_tmpl" {
  name = "focal_os_tmpl"
  pool = "VM"
  source = "file:///home/kroy/Documents/infra/terraform/libvirt/diskimages/focal-server-cloudimg-amd64.img"
  format = "qcow2"
}
Breaking this down:
- The
terraformsection describes the module versions I want to pull. In this case, I’m pulling thelibvirtandmikrotikmodules. Themikrotikmodule is used to automatically set a static DHCP lease on my CRS. This versioning is a the major change in terraform .13 I mentioned earlier. - The
libvirt“provider” section sets up the connection via ssh to the host running libvirt. Userkroyis in the libvirt group on the host. - The
mikrotikprovider section connects via the Mikrotik API to my switch that runs my DHCP. - The final block set up a template disk image using the cloud-init enabled image that was downloaded earlier.
- The next file is the
cloud_init.cfg. This file runs some “initial setup” tasks in the new VM.
#cloud-config
hostname: ${hostname}
fqdn: ${fqdn}
manage_etc_hosts: true
users:
  - name: root
    ssh-authorized-keys:
      - ${file("/home/kroy/.ssh/id_ed25519.pub")}
      - ${file("/home/kroy/Documents/infra/terraform/keys/id_ansible.pub")}
  - name: kroy
    sudo: ALL=(ALL) NOPASSWD:ALL
    groups: users, admin
    home: /home/kroy
    shell: /bin/bash
    lock_passwd: false
    ssh-authorized-keys:
      - ${file("/home/kroy/.ssh/id_ed25519.pub")}
      - ${file("/home/kroy/Documents/infra/terraform/keys/id_ansible.pub")}
# only cert auth via ssh (console access can still login)
ssh_pwauth: false
disable_root: false
chpasswd:
  list: |
     kroy:test
  expire: False
packages:
  - qemu-guest-agent

growpart:
  mode: auto
  devices: ['/']
  ignore_growroot_disabled: false

runcmd:
  - [ systemctl, daemon-reload ]
  - [ systemctl, enable, qemu-guest-agent.service ]
  - [ systemctl, start, --no-block, qemu-guest-agent.service ]
If you’ve got any sort of familiarity with Linux, most of what happens in this file should be somewhat self-explanatory, even if you are unfamiliar with the layout and formatting.
- Set up hostname, fqdn from variables that will be set from
vm.tf. - Make the
/etc/hostsfile match the proper config. - Setup ssh keys and a separate user. Set the ssh keys to my local ssh keys and ansible keys on my workstation
- Change the password on the
kroyuser - Install the QEMU Guest Agent. This is what allows the host and the VM to communicate.
- Grow the partition to the max size possible. This makes it so you can easily create a 5GB or 500GB VM from your
vm.tf. - Make sure the guest agent is running. I was having an issue with it not autostarting, but this series of
runcmdallows it to work.
- The
network_config.cfgfile. Somewhat self-documenting. There are other ways to do this, but I’ve found this is easiest for my setup:
version: 2
ethernets:
  ens3:
     dhcp4: true
This is just a standard netplan config that gets dropped on the new VM.
- The final piece is the
vm.tf. As my naming here suggests, this is the actual config for the VM.
# variables that can be overriden
variable "hostname" { default = "bgp" }
variable "domain" { default = "lan.kroy.io" }
variable "memoryGB" { default = 2 }
variable "cpu" { default = 2 }
variable "network" { default = "vibr20" }
variable "disksizeGB" { default = 20 }


resource "libvirt_volume" "os_image" {
  name = "${var.hostname}-os_image"
  pool   = "VM"
  base_volume_id = libvirt_volume.os_tmpl.id
  size = var.disksizeGB * 1024 * 1024 * 1024
}

# Use CloudInit ISO to add ssh-key to the instance
resource "libvirt_cloudinit_disk" "commoninit" {
  name = "${var.hostname}-commoninit.iso"
  pool = "VM"
  user_data = data.template_file.user_data.rendered
  network_config = data.template_file.network_config.rendered
}


data "template_file" "user_data" {
  template = file("${path.module}/cloud_init.cfg")
  vars = {
    hostname = var.hostname
    fqdn = "${var.hostname}.${var.domain}"
  }
}

data "template_file" "network_config" {
  template = file("${path.module}/network_config.cfg")
}


# Create the machine
resource "libvirt_domain" "domain-vm" {
  qemu_agent = true
  name = "${var.hostname}.${var.domain}"
  memory = var.memoryGB * 1024
  vcpu = var.cpu
  cloudinit = libvirt_cloudinit_disk.commoninit.id

  disk {
       volume_id = libvirt_volume.os_image.id
  }
  network_interface {
       wait_for_lease = true
       bridge = var.network
  }

  graphics {
    type = "spice"
    listen_type = "address"
    autoport = "true"
  }
  provisioner "local-exec" {
    environment = {
        IP = join("",slice([for ip in flatten(libvirt_domain.domain-vm.*.network_interface.0.addresses) : ip if substr(ip,0,8) == "10.20.20"],0,1))
    }
    command = "ANSIBLE_HOST_KEY_CHECKING=False ansible-playbook -i $IP, --key-file=~/Documents/infra/terraform/keys/id_ansible -u root ~/Documents/infra/terraform/ansible/docker/deploy-docker_ubuntu.yml"

  }

}


resource "mikrotik_dhcp_lease" "dhcp" {
  address = join("",slice([for ip in flatten(libvirt_domain.domain-vm.*.network_interface.0.addresses) : ip if substr(ip,0,8) == "10.20.20"],0,1))
  macaddress = upper(join("",libvirt_domain.domain-vm.*.network_interface.0.mac))
  comment = "${var.hostname}.${var.domain}"
  hostname = var.hostname
}
There’s obviously a lot going on here, but the short of it is I’ll be creating multiple resources. A cloud-init “boot disk”, some templates for passing into the cloud-init disk, the actual VM, and the DHCP record on my Mikrotik, which will read the IP of the created VM, and turn it into a static DHCP lease.
- The first part of this config is just some variables. As I create a new VM, assuming I just want a fairly basic VM, all I need to do is change some things here. To create a new VM, this is all that needs to be changed. Note that these can be stored in a
.tfvarsfile too for further separation. - The first resource is the actual VM disk. Note that the size is multipled by 1024*1024*1024 to translate the size from bytes to gigabytes, for ease of use.
- The next resource and following templates resources pulls in the cloud-init and network configs to build a cloud init image for initial booting and setup.
- The next resource defines the VM. Most of it should be self-explanatory. Things like making sure the guest agent is enabled, setting up the hostname and fqdn from the variables, vcpus, memory, disk. When you want to use data from a different resource, the format is “resource_type.resource_name.id”. So to later refer to this VM, you’d used
libvirt_domain.domain-vm.id.- We set up a spice console, important for connecting to it via something like
virt-manager. - The
network_interfaceresource here tells it to wait for a lease. This is necessary since I want my Mikrotik resource below to be have access to the IP that the VM was issued via DHCP. This saves me from having to hard-code IPs. - I have a
local-execprovisioner here. This is how I call Ansible to configure the VM. In this case I’ll be setting this host up as one of my Docker VMs. Note that I’m doing some severe hacky stuff to make sure I only grab the IP in the subnet that I want.
- We set up a spice console, important for connecting to it via something like
- Finally, the Mikrotik resource. As mentioned a few times, this sets a static DHCP lease on my main DHCP server, using the same hacky IP pulling code as above.
Terraforming the Virtual Machine
Now that all the resources and config are declared, it’s time to actually create the VM.
The first step is to initialize the terraform repo here. This causes it to pull the required modules and prepare for deployment.
❯ terraform init

Initializing the backend...

Initializing provider plugins...
- Finding latest version of hashicorp/template...
- Finding dmacvicar/libvirt versions matching "0.6.2"...
- Finding ddelnano/mikrotik versions matching "0.3.6"...
- Installing hashicorp/template v2.2.0...
- Installed hashicorp/template v2.2.0 (signed by HashiCorp)
- Installing dmacvicar/libvirt v0.6.2...
- Installed dmacvicar/libvirt v0.6.2 (unauthenticated)
- Installing ddelnano/mikrotik v0.3.6...
- Installed ddelnano/mikrotik v0.3.6 (self-signed, key ID DDBA1674AA3EA0EE)

Partner and community providers are signed by their developers.
If you'd like to know more about provider signing, you can read about it here:
https://www.terraform.io/docs/plugins/signing.html

The following providers do not have any version constraints in configuration,
so the latest version was installed.

To prevent automatic upgrades to new major versions that may contain breaking
changes, we recommend adding version constraints in a required_providers block
in your configuration, with the constraint strings suggested below.

* hashicorp/template: version = "~> 2.2.0"

Terraform has been successfully initialized!

You may now begin working with Terraform. Try running "terraform plan" to see
any changes that are required for your infrastructure. All Terraform commands
should now work.

If you ever set or change modules or backend configuration for Terraform,
rerun this command to reinitialize your working directory. If you forget, other
commands will detect it and remind you to do so if necessary.❯ terraform init

Initializing the backend...

Initializing provider plugins...
- Finding dmacvicar/libvirt versions matching "0.6.2"...
- Installing dmacvicar/libvirt v0.6.2...
- Installed dmacvicar/libvirt v0.6.2 (unauthenticated)

Terraform has been successfully initialized!

You may now begin working with Terraform. Try running "terraform plan" to see
any changes that are required for your infrastructure. All Terraform commands
should now work.

If you ever set or change modules or backend configuration for Terraform,
rerun this command to reinitialize your working directory. If you forget, other
commands will detect it and remind you to do so if necessary.
Assuming you get a success message there and some green text, you can proceed to plan or even apply.
plan shows you want it’s going to do. apply will do it (with confirmation by default, but it can be overridden).
❯ terraform plan
Refreshing Terraform state in-memory prior to plan...
The refreshed state will be used to calculate this plan, but will not be
persisted to local or remote state storage.

data.template_file.network_config: Refreshing state...
data.template_file.user_data: Refreshing state...

------------------------------------------------------------------------

An execution plan has been generated and is shown below.
Resource actions are indicated with the following symbols:
  + create

Terraform will perform the following actions:

  # libvirt_cloudinit_disk.commoninit will be created
  + resource "libvirt_cloudinit_disk" "commoninit" {
      + id             = (known after apply)
      + name           = "testvm-commoninit.iso"
      + network_config = <<~EOT
            version: 2
            ethernets:
              ens3:
                 dhcp4: true
        EOT
      + pool           = "VM"
      + user_data      = <<~EOT
            #cloud-config
            hostname: testvm
            fqdn: testvm.lan.kroy.io
            manage_etc_hosts: true
            users:
              - name: root
                ssh-authorized-keys:
                  - ssh-ed25519 key key1
                  - ssh-ed25519 key ansible

              - name: kroy
                sudo: ALL=(ALL) NOPASSWD:ALL
                groups: users, admin
                home: /home/kroy
                shell: /bin/bash
                lock_passwd: false
                ssh-authorized-keys:
                  - ssh-ed25519 key key1
                  - ssh-ed25519 key ansible

            # only cert auth via ssh (console access can still login)
            ssh_pwauth: false
            disable_root: false
            chpasswd:
              list: |
                 kroy:test
              expire: False
            packages:
              - qemu-guest-agent

            growpart:
              mode: auto
              devices: ['/']
              ignore_growroot_disabled: false

            runcmd:
              - [ systemctl, daemon-reload ]
              - [ systemctl, enable, qemu-guest-agent.service ]
              - [ systemctl, start, --no-block, qemu-guest-agent.service ]
        EOT
    }

  # libvirt_domain.domain-vm will be created
  + resource "libvirt_domain" "domain-vm" {
      + arch        = (known after apply)
      + cloudinit   = (known after apply)
      + disk        = [
          + {
              + block_device = null
              + file         = null
              + scsi         = null
              + url          = null
              + volume_id    = (known after apply)
              + wwn          = null
            },
        ]
      + emulator    = (known after apply)
      + fw_cfg_name = "opt/com.coreos/config"
      + id          = (known after apply)
      + machine     = (known after apply)
      + memory      = 2048
      + name        = "testvm.lan.kroy.io"
      + qemu_agent  = true
      + running     = true
      + vcpu        = 2

      + graphics {
          + autoport       = true
          + listen_address = "127.0.0.1"
          + listen_type    = "address"
          + type           = "spice"
        }

      + network_interface {
          + addresses      = (known after apply)
          + bridge         = "vibr20"
          + hostname       = (known after apply)
          + mac            = (known after apply)
          + network_id     = (known after apply)
          + network_name   = (known after apply)
          + wait_for_lease = true
        }
    }

  # libvirt_volume.os_image will be created
  + resource "libvirt_volume" "os_image" {
      + base_volume_id = (known after apply)
      + format         = (known after apply)
      + id             = (known after apply)
      + name           = "testvm-os_image"
      + pool           = "VM"
      + size           = 21474836480
    }

  # libvirt_volume.os_tmpl will be created
  + resource "libvirt_volume" "os_tmpl" {
      + format = "qcow2"
      + id     = (known after apply)
      + name   = "focal_os_tmpl"
      + pool   = "VM"
      + size   = (known after apply)
      + source = "file:///home/kroy/Documents/infra/terraform/libvirt/diskimages/focal-server-cloudimg-amd64.img"
    }

  # mikrotik_dhcp_lease.dhcp will be created
  + resource "mikrotik_dhcp_lease" "dhcp" {
      + address    = (known after apply)
      + blocked    = "false"
      + comment    = "testvm.lan.kroy.io"
      + dynamic    = false
      + hostname   = "testvm"
      + id         = (known after apply)
      + macaddress = (known after apply)
    }

Plan: 5 to add, 0 to change, 0 to destroy.

------------------------------------------------------------------------

Note: You didn't specify an "-out" parameter to save this plan, so Terraform
can't guarantee that exactly these actions will be performed if
"terraform apply" is subsequently run.
Note the bottom line where is says it’s going to add 5, change 0, destroy 0.
Keep remembering that all terraform is concerned with is state. So it will happily delete and nuke everything to get it to make the state that you want. So if a plan or apply says it’s going to delete a bunch of stuff and that’s not what you wanted, escape now!
Finally, terraform apply looks much like the plan above, and adds a few extra lines to confirm the operation (if you haven’t passed the option to skip it).
Plan: 5 to add, 0 to change, 0 to destroy.

Do you want to perform these actions?
  Terraform will perform the actions described above.
  Only 'yes' will be accepted to approve.

  Enter a value: yes

...

Apply complete! Resources: 5 added, 0 changed, 0 destroyed
This should hopefully complete without error, and if you do a virsh list on the libvirt host, you’ll see something like:
# virsh list
 Id   Name                 State
------------------------------------
 1    testvm.lan.kroy.io   running
In my terraform apply output, I have libvirt_domain.domain-vm (local-exec): ok: [10.20.20.79], which means I should be able to ssh there
❯ ssh [email protected]
Warning: Permanently added '10.20.20.79' (ECDSA) to the list of known hosts.
Welcome to Ubuntu 20.04.1 LTS (GNU/Linux 5.4.0-51-generic x86_64)

 * Documentation:  https://help.ubuntu.com
 * Management:     https://landscape.canonical.com
 * Support:        https://ubuntu.com/advantage

  System information as of Mon Nov  2 17:55:54 UTC 2020

  System load:              0.0
  Usage of /:               11.0% of 19.21GB
  Memory usage:             15%
  Swap usage:               0%
  Processes:                121
  Users logged in:          0
  IPv4 address for docker0: 172.17.0.1
  IPv4 address for ens3:    10.20.20.79


41 updates can be installed immediately.
15 of these updates are security updates.
To see these additional updates run: apt list --upgradable


The programs included with the Ubuntu system are free software;
the exact distribution terms for each program are described in the
individual files in /usr/share/doc/*/copyright.

Ubuntu comes with ABSOLUTELY NO WARRANTY, to the extent permitted by
applicable law.

To run a command as administrator (user "root"), use "sudo ".
See "man sudo_root" for details.

[email protected]:~$
SUCCESS!
Terragrunt
Even though we’ve only got a single resource so far, I want to touch on what terragrunt accomplishes for you.
Terraform only works on single directories. So say I wanted to add a second VM.
I would do something like:
cd terraformroot
cp -pr vms/testvm.lan.kroy.io vms/doubletest.lan.kroy.io
rm vms/doubletest.lan.kroy.io/terraform.tfstate*
sed -i -e 's/testvm/doubletest/' vms/doubletest.lan.kroy.io/vm.tf
Hopefully that is mostly self-explanatory:
- Change into our terraform directory.
- Copying the existing config to a new VM directory.
- Remove all the old terraform state files. This is VERY important if you are going to be using terraform like this. This is basically the main “database” for terraform and if you want to create a new resource, you don’t want the old database in the new resource directory.
- A not-so-fancy one-liner to change the hostname of the new VM.
Now you would have a few options to determine how you want to apply this configuration:
- Switch to
terraformroot/vms/doubletest.lan.kroy.io, do aterraform apply. This would only apply the state for this VM. - Switch to
terraformroot/vms, do aterragrunt apply-all. This would apply the state fortestvm.lan.kroy.ioanddoubletest.lan.kroy.io. - Switch to
terraformroot, and again,terragrunt apply-all. This would apply the state for all resources undervms, and any future projects, like networking configs, LXC, etc.
In all that, you can also do plan-all on terragrunt to see what it’s going to change.
In the directory for these VMs resources, I’ve got a terragrunt.hcl. The contents of this are simply:
include {
  path = find_in_parent_folders()
}
This says “look in any parent folders, and execute the actions of their terragrunt.hcl.”
This is powerful because you can have specific actions for just the vms directory or everything. That’s why the content of my terragrunt.hcl in the vms directory contains:
terraform {
  after_hook "after_hook" {
    commands     = ["apply"]
    execute      = ["/bin/bash","/home/kroy/Documents/infra/terraform/updatedns.sh"]
    run_on_error = true
  }
}
As is implied, this runs after you type terragrunt apply or apply-all.
Being in the vms sub-directory, when would this run?
- In the individual VM resource directory due to the
find_in_parent_folderswhen you run terragrunt with apply or apply-all. - In the
vmssub-directory when running apply all. You can’t run apply because that only looks in the current directory. - In the main
terraformrootdirectory.
So running a terragrunt apply-all in the vms directory:
[terragrunt] 2020/11/02 12:13:11 Stack at /home/kroy/Desktop/esxitolibvirt-blog/terraform/vms:
  => Module /home/kroy/Desktop/esxitolibvirt-blog/terraform/vms/doubletest.lan.kroy.io (excluded: false, dependencies: [])
  => Module /home/kroy/Desktop/esxitolibvirt-blog/terraform/vms/testvm.lan.kroy.io (excluded: false, dependencies: [])
[terragrunt] 2020/11/02 12:13:11 [terragrunt]  Are you sure you want to run 'terragrunt apply' in each folder of the stack described above? (y/n)
The output of this shows that the new VM was created (and the original VM was at least looked at), and my post-hook is run once:
Apply complete! Resources: 0 added, 1 changed, 0 destroyed.
[terragrunt] [/home/kroy/Desktop/esxitolibvirt-blog/terraform/vms/testvm.lan.kroy.io] 2020/11/02 12:14:52 Detected 1 Hooks
[terragrunt] [/home/kroy/Desktop/esxitolibvirt-blog/terraform/vms/testvm.lan.kroy.io] 2020/11/02 12:14:52 Executing hook: after_hook
[terragrunt] [/home/kroy/Desktop/esxitolibvirt-blog/terraform/vms/testvm.lan.kroy.io] 2020/11/02 12:14:52 Running command: /bin/bash /home/kroy/Documents/infra/terraform/updatedns.sh
[terragrunt] [/home/kroy/Desktop/esxitolibvirt-blog/terraform/vms/testvm.lan.kroy.io] 2020/11/02 12:14:52 Module /home/kroy/Desktop/esxitolibvirt-blog/terraform/vms/testvm.lan.kroy.io has finished successfully!
Conclusion
Well, there you have it. Is this the perfect layout? Probably not. Is there room for improvement? Absolutely.
I have put up a git repo HERE, containing all of the examples from above.
Of course this is far from complete. With this setup, all you have are fairly blank and basic VMs. You’d want to hit them with Ansible or something to finish configuring them. But that’s a post for another day.
Enjoy!