For the novice networker, VLANs are easily one of the most misunderstood concepts. In this post, I’ll go over some basics and demonstrate how to make the jump from separate interfaces and switches to VLANs.
Introduction
Virtual LANs, or VLANs, are one of the most useful features in all of networking. To put it simply, they allow a logical separation of broadcast domains. In layperson’s terms, “I took a switch and put it in your switch!”.
I think it’s best to start with a traditional physical setup that would represent how most people start their networking adventures.
Physical Setup
For this adventure, I’ll be using be using:
- The WYSE 3040 from a previous blog post.
- An array of small Mikrotiks (hex, hap, hex lite) since they are painfully easy to set up as both simple switches and managed switches supporting VLANs.
- A few Virtual Machines to act as end devices, also from a prior blog post.
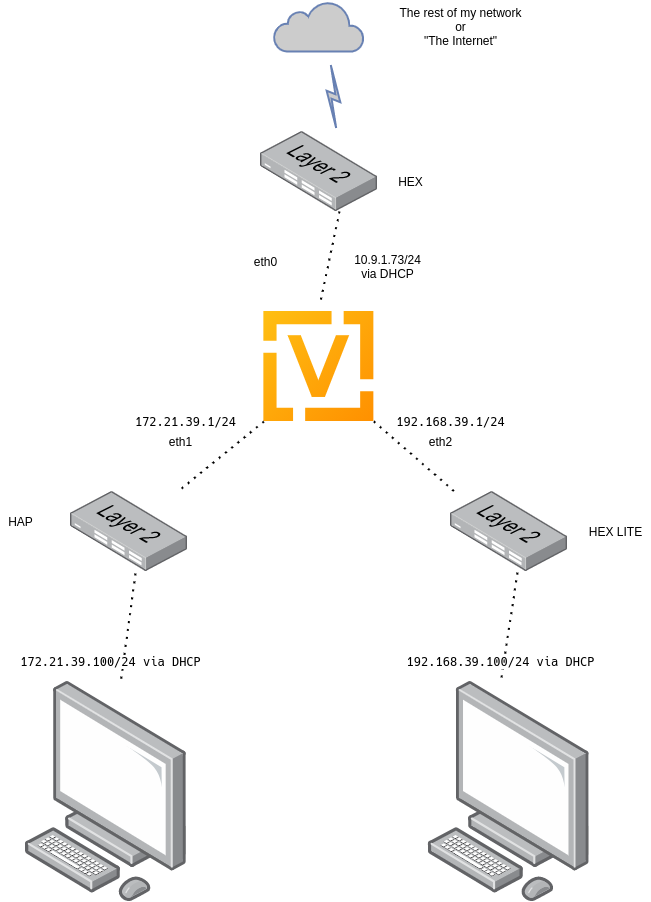
Let’s start with this simple network diagram.
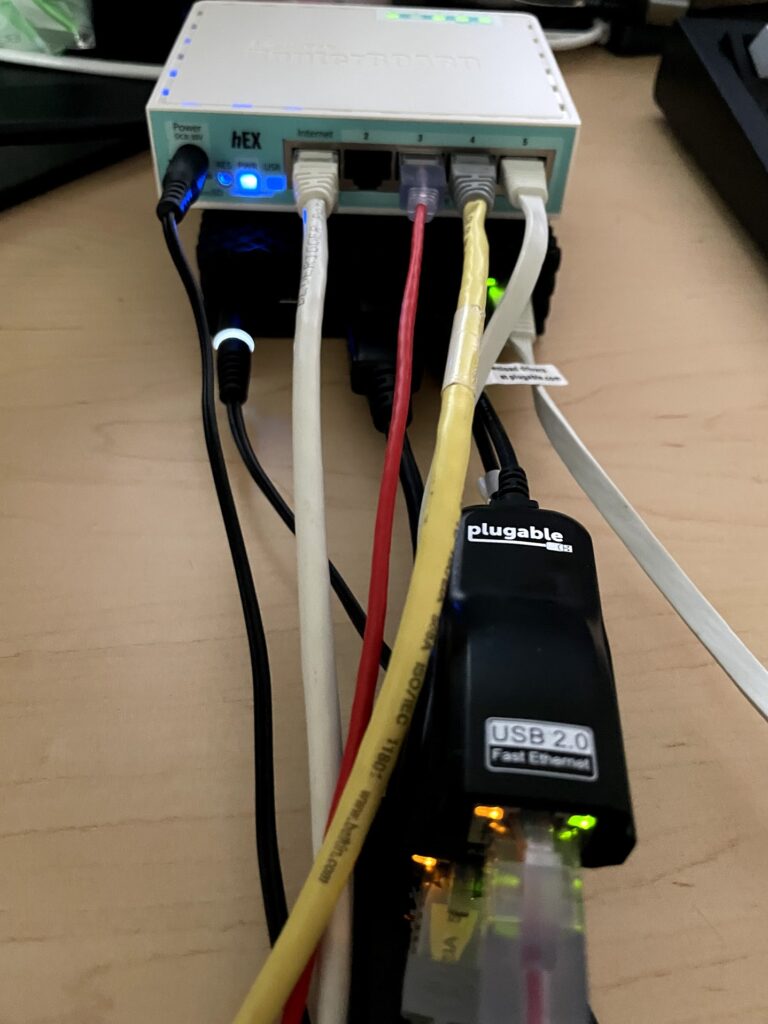
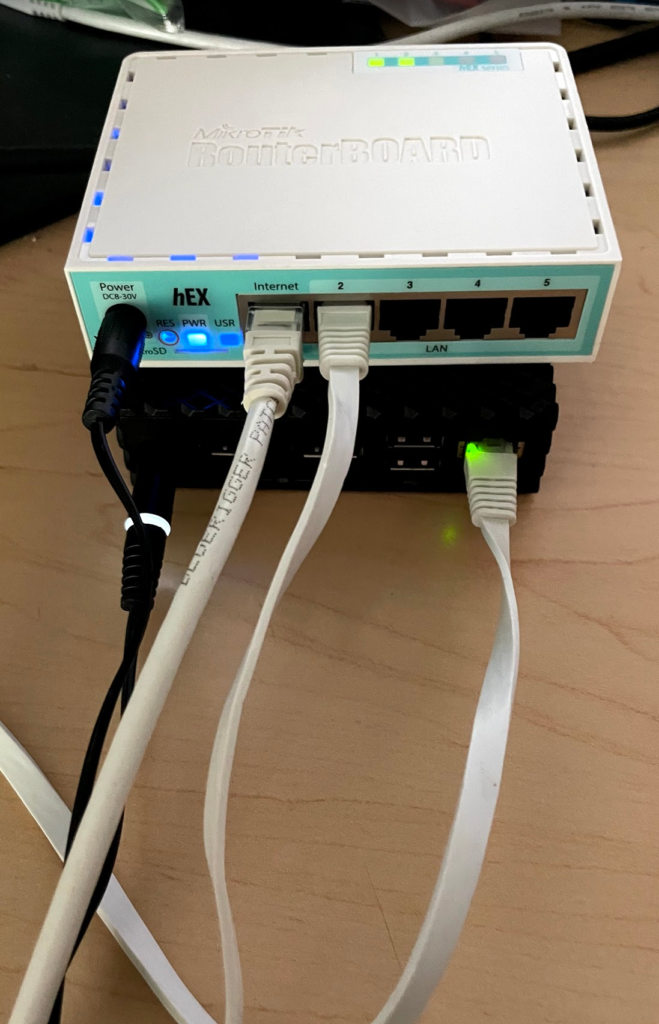
and how does this setup look when it’s all wired up?

Networking Config
This is the basic config for all three of the switches. I don’t want to get too bogged down with the Mikrotik config, but I should explain some of it.
In the Linux world, and subsequently in Mikrotik-land, a switch would be called a “bridge”. So in this case, I’ve created a bridge and added all the ports to it. And then I’ve told the switches to pull an IP address from the bridge for management.
[[email protected]] > /export
# jun/28/2021 21:03:30 by RouterOS 6.48.3
# software id = IMPN-EEMU
#
# model = RB750Gr3

/interface bridge
add admin-mac=B8:69:F4:AB:2E:7A auto-mac=no comment=defconf name=bridgeLocal
/interface bridge port
add bridge=bridgeLocal comment=defconf interface=ether1
add bridge=bridgeLocal comment=defconf interface=ether2
add bridge=bridgeLocal comment=defconf interface=ether3
add bridge=bridgeLocal comment=defconf interface=ether4
add bridge=bridgeLocal comment=defconf interface=ether5
/ip dhcp-client
add comment=defconf disabled=no interface=bridgeLocal
This configuration essentially turns these Mikrotik devices into a dumb switch, with an IP address to manage them. They are also plugged into my existing network:
- HEX into my “WAN” network (random VLAN on my existing network that has internet access)
- HAP into a VLAN connected to the “enduser1” VM
- HEX LITE into a VLAN connected to the “enduser2” VM.
VyOS Config
The VyOS config here on the WYSE 3040 is very simple:
- Onboard NIC is eth0, connected to WAN/HEX switch, pulling an IP from my existing infrastructure.
- USB NIC1 is eth1, connected to HAP switch
- USB NIC2 is eth2, connected to HEX switch
- Some NAT, so my test clients can get on the Internet
- Some DHCP, so my test clients can auto-configure themselves
interfaces {
ethernet eth0 {
address dhcp
description WAN
hw-id 8c:ec:4b:6d:dc:d6
}
ethernet eth1 {
address 172.21.39.1/24
description HAPLAN
hw-id 8c:ae:4c:f5:e5:8f
}
ethernet eth2 {
address 192.168.39.1/24
description HEXLITELAN
hw-id 8c:ae:4c:f5:e5:94
}
loopback lo {
}
}
nat {
source {
rule 10 {
outbound-interface eth0
source {
address 172.21.39.0/24
}
translation {
address masquerade
}
}
rule 11 {
outbound-interface eth0
source {
address 192.168.39.0/24
}
translation {
address masquerade
}
}
}
}
service {
dhcp-server {
shared-network-name HAPDHCP {
subnet 172.21.39.0/24 {
default-router 172.21.39.1
dns-server 10.53.53.53
range 0 {
start 172.21.39.100
stop 172.21.39.200
}
}
}
shared-network-name HEXLITEDHCP {
subnet 192.168.39.0/24 {
default-router 192.168.39.1
dns-server 10.53.53.53
range 0 {
start 192.168.39.100
stop 192.168.39.200
}
}
}
}
ssh {
port 22
}
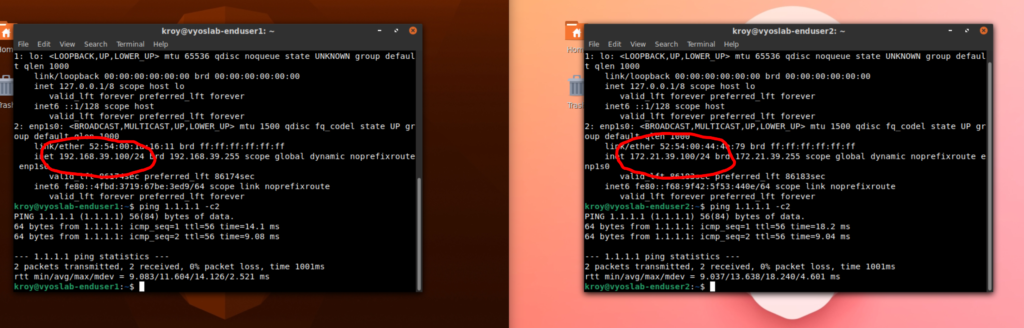
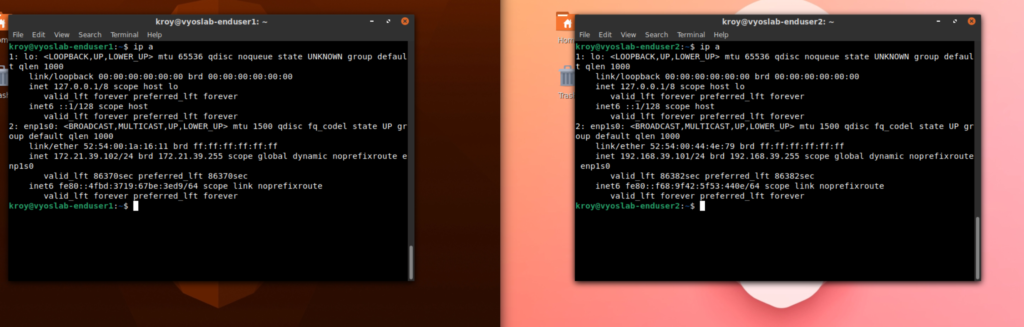
}And once it’s all set up, the two “enduser” VMs both have appropriate IP addresses and Internet access as served out by the VyOS-3040:
VLANs
Of course we aren’t here to just make a simple multi-network setup. We want some VLANs. So let’s rewrite some things, and eliminate two of the switches.
First off, let’s talk about the physical setup we had before. Before, each of the different switches were connected to “raw” ports connecting to existing VLANs on my network:
- HEX: VAN9. This is an existing client network in my homelab. You plug something in here, it gets a 10.9.1.0/24 address, and instantly has Internet access. This is what the “WAN” port of VyOS connects to.
- HAP: VLAN41. This was a new VLAN I created to connect between eth1 on VyOS and the “enduser1” VM.
- HEX LITE: VLAN42. Similarly, a new VLAN I created to connect between eth2 on VyOS and the “enduser2” VM.
Physically, this is how the new setup will look:
In most networking circles, a “trunk” just means a port carrying multiple VLANs. Since we removed two switches, the remaining switch, the HEX, will need to have its uplink port changed into a trunk:
- Remove HAP and HEX LITE switches
- On the HEX, change the port that was previously connected to a raw VLAN9 port on my existing network to a trunk.
- Plug eth1 from VyOS into port 4 on HEX, change the VLAN of that port to 41
- Plug eth2 from VyOS into port 3 on HEX, change the VLAN of the port to 42
- Change the VLAN on port 5 on the HEX to 9. This will change the PVID, or the raw VLAN that’s use when whatever is plugged in on the other end isn’t speaking VLANs.
- Due to the prior step, the nothing on VyOS will change
The characteristics of our trunk ports will be simple:
- VLAN1 == PVID/untagged. This is the VLAN traffic will land on if the traffic has no VLAN tags
- VLAN9 == Tagged.
- VLAN41 == Tagged
- VLAN42 == Tagged
I’ve highlighted the important changes on the remaining switch below:
- Add an Switched Virtual Interface or SVI. This is saying “Give this switch an interface on this VLAN”. This is important because VLAN9 is no longer the default “untagged” for the uplink port (ether1)
- Change the PVIDs/default VLANs of the appropriate ports on the bridge. We are doing this to make the VyOS-3040 think nothing has changed in our physical setup.
- Handle VLAN filtering. This is going to control what VLANs are allowed on these ports. This is how you create a trunk port in Mikrotik
ether1is the Trunk to the rest of the network. It is untagged on VLAN1 (which is a throwaway VLAN for security). It is tagged on the other two VLANs we are using, 41 and 42.bridgeLocalis Mikrotik itself. It is untagged on VLAN1 for similar reasons as above. It it tagged on VLAN9 as this is what allows our newly createdVLAN9_SVIso we can create a management address for it.ether3/4/5are all untagged on the VLANs that match the PVIDs.
- Finally, we tell the Mikrotik to pull its address via DHCP on the newly created
VLAN9_SVI
# jun/29/2021 10:27:41 by RouterOS 6.48.3
# software id = IMPN-EEMU
#
# model = RB750Gr3

/interface bridge
add admin-mac=B8:69:F4:AB:2E:7A auto-mac=no comment=defconf name=bridgeLocal vlan-filtering=yes
/interface vlan
add interface=bridgeLocal name=VLAN9_SVI vlan-id=9
/interface bridge port
add bridge=bridgeLocal comment=defconf interface=ether1
add bridge=bridgeLocal comment=defconf interface=ether2
add bridge=bridgeLocal comment=defconf interface=ether3 pvid=42
add bridge=bridgeLocal comment=defconf interface=ether4 pvid=41
add bridge=bridgeLocal comment=defconf interface=ether5 pvid=9
/interface bridge vlan
add bridge=bridgeLocal untagged=bridgeLocal,ether1 vlan-ids=1
add bridge=bridgeLocal tagged=bridgeLocal,ether1 untagged=ether5 vlan-ids=9
add bridge=bridgeLocal tagged=ether1 untagged=ether4 vlan-ids=41
add bridge=bridgeLocal tagged=ether1 untagged=ether3 vlan-ids=42
/ip dhcp-client
add comment=defconf disabled=no interface=VLAN9_SVI
As mentioned above, everything just works as before. As far as the VyOS-3040 is concerned, it is still connected to three separate switches:
VLANs – Going Deeper
Of course, we haven’t even touched VLANs on VyOS yet, so let’s dig into that.
The basic goals will be:
- Remove all the dongles
- Move the cable that goes to VyOS-3040 from port 5 to port 2.
- Trunk VLANs 41 and 42 into VyOS
- Change the config in VyOS to use VLAN interfaces instead of physical interfaces.
Physically, this is starting to look super clean. We only have two cables plugged into the switch, the trunk from the existing networking and the trunk to the VyOS-3040.
I’ve highlighted the changes to the switch, but basically we are turning port 2 into another trunk, BUUUUT, a trunk with the PVID of 9:
- Change the PVID of ether2 to 9. This is to make it so VyOS-3040 still is “on” VLAN9 on its raw port
- Add ether2 as untagged on VLAN9
- Add ether2 as tagged on VLANs 41/42
# jun/29/2021 10:49:20 by RouterOS 6.48.3
# software id = IMPN-EEMU
#
# model = RB750Gr3
# serial number = 8AFF09A3F98D
/interface bridge
add admin-mac=B8:69:F4:AB:2E:7A auto-mac=no comment=defconf name=bridgeLocal vlan-filtering=yes
/interface vlan
add interface=bridgeLocal name=VLAN9_SVI vlan-id=9
/interface bridge port
add bridge=bridgeLocal comment=defconf interface=ether1
add bridge=bridgeLocal comment=defconf interface=ether2 pvid=9
add bridge=bridgeLocal comment=defconf interface=ether3 pvid=42
add bridge=bridgeLocal comment=defconf interface=ether4 pvid=41
add bridge=bridgeLocal comment=defconf interface=ether5 pvid=9
/ip neighbor discovery-settings
set discover-interface-list=!dynamic
/interface bridge vlan
add bridge=bridgeLocal untagged=bridgeLocal,ether1 vlan-ids=1
add bridge=bridgeLocal tagged=bridgeLocal,ether1 untagged=ether5,ether2 vlan-ids=9
add bridge=bridgeLocal tagged=ether1,ether2 untagged=ether4 vlan-ids=41
add bridge=bridgeLocal tagged=ether1,ether2 untagged=ether3 vlan-ids=42
/ip dhcp-client
add comment=defconf disabled=no interface=VLAN9_SVI
And in VyOS, the only change is removing eth1/eth2, and moving the config under the appropriate vif:
interfaces {
    ethernet eth0 {
        address dhcp
        description WAN
        hw-id 8c:ec:4b:6d:dc:d6
        vif 41 {
            address 172.21.39.1/24
            description HAPLAN
        }
        vif 42 {
            address 192.168.39.1/24
            description HEXLITELAN
        }
    }
    loopback lo {
    }
}
which we can now access everywhere via eth0.41/eth0.42.
[email protected]:~$ show interfaces
Codes: S - State, L - Link, u - Up, D - Down, A - Admin Down
Interface        IP Address                        S/L  Description
---------        ----------                        ---  -----------
eth0             10.9.1.73/24                      u/u  WAN
eth0.41          172.21.39.1/24                    u/u  HAPLAN
eth0.42          192.168.39.1/24                   u/u  HEXLITELAN
VLANs – Gotta Find the Bottom!
Of course, if you are like me, you turn everything into a trunk to routers.
So we are going to remove VLAN as the PVID from our VyOS-3040 facing port, and just tag it:
[[email protected]] > export
# jun/29/2021 10:52:50 by RouterOS 6.48.3
# software id = IMPN-EEMU
#
# model = RB750Gr3
/interface bridge
add admin-mac=B8:69:F4:AB:2E:7A auto-mac=no comment=defconf name=bridgeLocal vlan-filtering=yes
/interface vlan
add interface=bridgeLocal name=VLAN9_SVI vlan-id=9
/interface bridge port
add bridge=bridgeLocal comment=defconf interface=ether1
add bridge=bridgeLocal comment=defconf interface=ether2
add bridge=bridgeLocal comment=defconf interface=ether3 pvid=42
add bridge=bridgeLocal comment=defconf interface=ether4 pvid=41
add bridge=bridgeLocal comment=defconf interface=ether5 pvid=9
/interface bridge vlan
add bridge=bridgeLocal untagged=bridgeLocal,ether1,ether2 vlan-ids=1
add bridge=bridgeLocal tagged=bridgeLocal,ether1,ether2 untagged=ether5 vlan-ids=9
add bridge=bridgeLocal tagged=ether1,ether2 untagged=ether4 vlan-ids=41
add bridge=bridgeLocal tagged=ether1,ether2 untagged=ether3 vlan-ids=42
/ip dhcp-client
add comment=defconf disabled=no interface=VLAN9_SVI
and a few small changes to VyOS. We move the “WAN” dhcp to a VLAN, and change the outbound-interface for the NAT:
[email protected]:~$ show configuration
interfaces {
    ethernet eth0 {
        hw-id 8c:ec:4b:6d:dc:d6
        vif 9 {
            address dhcp
            description WAN
        }
        vif 41 {
            address 172.21.39.1/24
            description HAPLAN
        }
        vif 42 {
            address 192.168.39.1/24
            description HEXLITELAN
        }
    }
    loopback lo {
    }
}
nat {
    source {
        rule 10 {
            outbound-interface eth0.9
            source {
                address 172.21.39.0/24
            }
            translation {
                address masquerade
            }
        }
        rule 11 {
            outbound-interface eth0.9
            source {
                address 192.168.39.0/24
            }
            translation {
                address masquerade
            }
        }
    }
}
service {
    dhcp-server {
        shared-network-name HAPDHCP {
            subnet 172.21.39.0/24 {
                default-router 172.21.39.1
                dns-server 10.53.53.53
                range 0 {
                    start 172.21.39.100
                    stop 172.21.39.200
                }
            }
        }
        shared-network-name HEXLITEDHCP {
            subnet 192.168.39.0/24 {
                default-router 192.168.39.1
                dns-server 10.53.53.53
                range 0 {
                    start 192.168.39.100
                    stop 192.168.39.200
                }
            }
        }
    }
    ssh {
        port 22
    }
}
And if we show our interfaces:
[email protected]:~$ show interfaces
Codes: S - State, L - Link, u - Up, D - Down, A - Admin Down
Interface        IP Address                        S/L  Description
---------        ----------                        ---  -----------
eth0             -                                 u/u
eth0.9           10.9.1.73/24                      u/u  WAN
eth0.41          172.21.39.1/24                    u/u  HAPLAN
eth0.42          192.168.39.1/24                   u/u  HEXLITELAN
lo               127.0.0.1/8                       u/u
                 ::1/128
Conclusion
That’s it! I’ve walked through going from a traditional network with 3 separate interfaces to a single interface carrying the traffic of all three networks.
On to the next!