For a while now I’ve wanted to document a more complex routing setup with VyOS, and here it is. Routing with BGP, WireGuard to a VPS, and Policy Based Routing?
This should be a fun one.
Routing has easily become one of my favorite lab tasks. Especially since at one point, it was such an incredibly cryptic thing to me.
So fair warning. This will be long.
I’m going to:
- Set up a VPS and an internal home router.
- Use WireGuard to connect the VPS and internal home router
- Set up multiple other internal routers and get the traffic flowing.
- Route traffic from a basic desktop through the VPS, all via BGP.
Routing
Routing, put most simply, is: “Where do I find this IP address I’m looking for”.
So if a host/server/device wants to get to an IP, it needs to know the path to get there. And it can only talk to devices that it’s locally connected to, which means a device on a local interface/subnet with it.
There are two main types of routing I’ll be talking about.
Static, which is “hey, I know what subnets are where, and I’ll map everything manually”, and dynamic, which is “I’m going to set up relationships with other routers and learn stuff automatically”.
BGP, or Border Gateway Protocol, is the type of dynamic routing I’ll be using here.
Let’s break down the main routing table on one of my primary routers (show ip route in VyOS):
B>* 0.0.0.0/0 [20/0] via 10.245.245.9, eth0.508, weight 1, 00:00:08
C * 10.0.11.0/24 is directly connected, eth0.11, 01w0d22h
C>* 10.0.11.0/24 is directly connected, eth0.11, 01w0d22h
C>* 10.0.35.0/30 is directly connected, eth0.35, 01w0d22h
C * 10.3.1.0/24 is directly connected, eth0.3, 01w0d22h
C>* 10.3.1.0/24 is directly connected, eth0.3, 01w0d22h
C * 10.9.1.0/24 is directly connected, eth0.9, 01w0d22h
C>* 10.9.1.0/24 is directly connected, eth0.9, 01w0d22h
C * 10.10.8.0/24 is directly connected, eth0.8, 01w0d22h
C>* 10.10.8.0/24 is directly connected, eth0.8, 01w0d22h
C * 10.10.51.0/24 is directly connected, eth0.51, 01w0d22h
C>* 10.10.51.0/24 is directly connected, eth0.51, 01w0d22h
C * 10.20.20.0/24 is directly connected, eth0.20, 01w0d22h
C>* 10.20.20.0/24 is directly connected, eth0.20, 01w0d22h
C * 10.21.21.0/24 is directly connected, eth0.21, 01w0d22h
C>* 10.21.21.0/24 is directly connected, eth0.21, 01w0d22h
C * 10.22.22.0/24 is directly connected, eth0.22, 01w0d22h
C>* 10.22.22.0/24 is directly connected, eth0.22, 01w0d22h
B>* 10.53.53.53/32 [20/0] via 10.3.1.252, eth0.3, weight 1, 01w0d22h
  *                       via 10.3.1.254, eth0.3, weight 1, 01w0d22h
B>* 10.53.53.54/32 [20/0] via 10.3.1.252, eth0.3, weight 1, 01w0d22h
  *                       via 10.3.1.254, eth0.3, weight 1, 01w0d22h
C>* 10.245.245.8/30 is directly connected, eth0.508, 01w0d22h
There is lots going on here, but hopefully most of it is pretty straightforward:
B>* 0.0.0.0/0: This route is learned from my main edge router via BGP. This is a CIDR that represents “Every address on the Internet”. That means any IP or subnet that this server doesn’t know about, will be forwarded to the device at10.245.245.9.C> * ...andC *all represent “directly connected”. This means these are all subnets that exist directly on this router. There are multiple entries here because I’m using VRRP and this router is currently holding the MASTER status for the redundant IP:
- I have two special entries here,
10.53.53.53/32and10.53.53.54/32. These are both learned from my DNS servers via BGP, for a type of “anycast DNS”. Meaning, if the 252 host is down, 10.53.53.53 and 10.53.53.54 will still both respond to DNS queries served from the 254 host. Vice versa with the 254 host. I can spin up extra DNS servers with zero effort and they would still respond to my custom DNS IPs. At one point my DNS range was10.3.1.248-254, which means I had a LOT of DNS servers all responding to the same two IPs. This prevents weirdness in how different operating systems handle primary and backup DNS. - Finally, another directly connected route. This is the
/30that talks to my main edge router
Let’s talk about CIDRs
CIDRs are a very important concept in routing. They represent the /24 after the network in the above descriptions. The smaller the CIDR number, the more IP addresses that network represents.
Most subnets have a network address and a broadcast address, neither which can be used for hosts in that subnet.
In my opinion, using a tool like sipcalc makes it super clear:
- A normal
/24. This is what people normally use for LAN subnets. A nice range of 254 usable. addresses. Many people would put their router at10.3.1.1or10.3.1.254, and reserve a DHCP range for somewhere in the middle. The .0 and .255 addresses are reserved for the network address and broadcast respectively.
❯ sipcalc 10.3.1.0/24
-[ipv4 : 10.3.1.0/24] - 0

[CIDR]
Host address            - 10.3.1.0
Host address (decimal)  - 167969024
Host address (hex)      - A030100
Network address         - 10.3.1.0
Network mask            - 255.255.255.0
Network mask (bits)     - 24
Network mask (hex)      - FFFFFF00
Broadcast address       - 10.3.1.255
Cisco wildcard          - 0.0.0.255
Addresses in network    - 256
Network range           - 10.3.1.0 - 10.3.1.255
Usable range            - 10.3.1.1 - 10.3.1.254
- A
/30. Often used for point-to-point links. Four addresses are represented, but only the middle two are available, again due to the network/broadcast addresses.
❯ sipcalc 10.245.245.8/30
-[ipv4 : 10.245.245.8/30] - 0

[CIDR]
Host address            - 10.245.245.8
Host address (decimal)  - 183891208
Host address (hex)      - AF5F508
Network address         - 10.245.245.8
Network mask            - 255.255.255.252
Network mask (bits)     - 30
Network mask (hex)      - FFFFFFFC
Broadcast address       - 10.245.245.11
Cisco wildcard          - 0.0.0.3
Addresses in network    - 4
Network range           - 10.245.245.8 - 10.245.245.11
Usable range            - 10.245.245.9 - 10.245.245.10
- Most people use the larger subnets as “summary networks”, such as with this
/8. It would include the10.3.1.0/24and10.245.245.8/30from above. Meaning if you wanted to target both, and didn’t want to have two routing entries, you could just use a single route:
❯ sipcalc 10.0.0.0/8
-[ipv4 : 10.0.0.0/8] - 0

[CIDR]
Host address            - 10.0.0.0
Host address (decimal)  - 167772160
Host address (hex)      - A000000
Network address         - 10.0.0.0
Network mask            - 255.0.0.0
Network mask (bits)     - 8
Network mask (hex)      - FF000000
Broadcast address       - 10.255.255.255
Cisco wildcard          - 0.255.255.255
Addresses in network    - 16777216
Network range           - 10.0.0.0 - 10.255.255.255
Usable range            - 10.0.0.1 - 10.255.255.254
- Finally, a few “special” subnets/CIDRs. We have a
/31, which is used for point-to-point links and not waste two addresses, and0.0.0.0/0, which is default route to represent the whole Internet. Note that the.0address in the/31is actually usable! Meaning the two usable addresses are10.42.42.0 / 10.42.42.1. This is an oddity if you aren’t accustomed to it:
❯ sipcalc 10.42.42.0/31
-[ipv4 : 10.42.42.0/31] - 0

[CIDR]
Host address            - 10.42.42.0
Host address (decimal)  - 170535424
Host address (hex)      - A2A2A00
Network address         - 10.42.42.0
Network mask            - 255.255.255.254
Network mask (bits)     - 31
Network mask (hex)      - FFFFFFFE
Broadcast address       - 10.42.42.1
Cisco wildcard          - 0.0.0.1
Addresses in network    - 2
Network range           - 10.42.42.0 - 10.42.42.1
❯ sipcalc 0.0.0.0/0
-[ipv4 : 0.0.0.0/0] - 0

[CIDR]
Host address            - 0.0.0.0
Host address (decimal)  - 0
Host address (hex)      - 0
Network address         - 0.0.0.0
Network mask            - 0.0.0.0
Network mask (bits)     - 0
Network mask (hex)      - 0
Broadcast address       - 255.255.255.255
Cisco wildcard          - 255.255.255.255
Addresses in network    - 4294967295
Network range           - 0.0.0.0 - 255.255.255.255
Usable range            - 0.0.0.1 - 255.255.255.254
So 10.53.53.0/24 encompasses 10.53.53.53/32. And in the routing world, if you were to have routes for both in your routing table, the more specific, /32, would be the one chosen to get to the 10.53.53.53 host.
I know all that was a bit of an information dump, but hopefully it illustrated a few things.
Home -> VPS Setup
I don’t want to get too bogged down with the details of how the Home and VPS routers are configured. But I’m using a relatively recent vyos-rolling build, and have spun up a cheap VPS at Vultr for this blog.
This diagram demonstrates what I am trying to achieve:
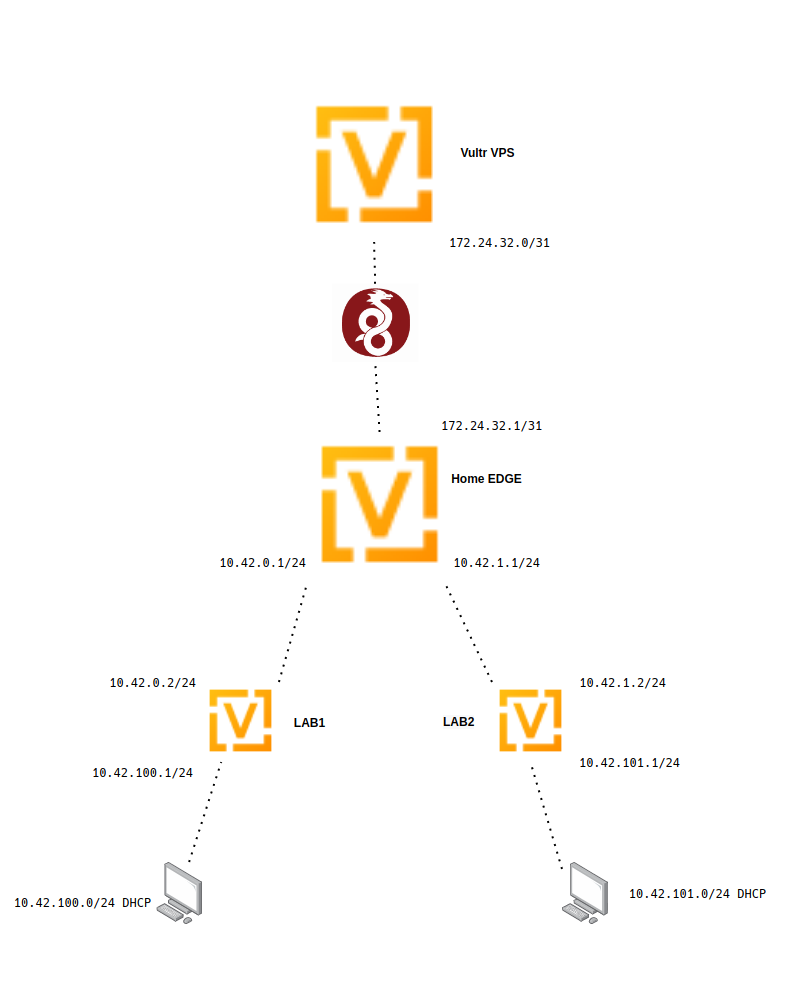
Home Setup
At home, I’ve buried a brand new VyOS VM deep within my network. So this is really going to represent the setup of someone that’s behind multiple layers of NAT, including carrier-grade, meaning they might not be able to port forward.
This is our edge router for this setup.
I’m assuming some familiarity with VyOS in general, but I’ll briefly touch over what’s in the attached config:
- Run
generate wireguard named-keypairs Vultrin op-mode. This creates the private key for putting in the following config. - Run
show wireguard keypairs pubkey Vultrto get the pubkey to put in the VPS config. - Set up the “WAN” connection. This is just some random static IP on an existing LAN.
- Set up a pair interfaces that are going to talk to a few other routers. These
10.42.0.0/16or10.42.0-255.0/24addresses are the main subnets that we are going to be playing with. - Do a little bit of source NAT. This will make anything behind this router on any subnet inside of
10.42.0.0/16be able to get to the Internet. - Set up a WireGuard connection to my VPS (this will be deleted before this blog is posted, which is why I’m keeping the IP).
- Set the description and local IP for this tunnel. I’m using a
/31as mentioned in the above CIDR section. - Set the
allowed-ips. This is the traffic we want to allow the traverse this tunnel. We are including both the tunnel/31subnet and the/16subnet. - Make sure we have the
persistent-keepalive 15set here. Since we aren’t doing a site-to-site, we need to make sure to have this, so the tunnel doesn’t timeout. The tunnel can ONLY be brought up when traffic attempts to go from Home->VPS and not vice-versa because we are emulating CGNAT here. - The address and the port of the VPS that WireGuard is configured to listen on
- The public key of the VPS. From running
show wireguard keypairs pubkey Homeon the VPS after generating it withgenerate wireguard named-keypairs Home
- Set the description and local IP for this tunnel. I’m using a
- Choosing the local private key to use for this connection. It should match the “generate …” you ran above.
- My default route for this router so I have Internet access
- turning on SSH and naming this router
[email protected]:~$ show configuration commands
set interfaces ethernet eth0 address '10.21.21.10/24'
set interfaces ethernet eth0 description 'WAN'
set interfaces ethernet eth1 address '10.42.0.1/24'
set interfaces ethernet eth1 description 'LAB1'
set interfaces ethernet eth2 address '10.42.1.1/24'
set interfaces ethernet eth2 description 'LAB2'
set interfaces loopback lo
set nat source rule 10 description 'Outgoing NAT'
set nat source rule 10 outbound-interface 'eth0'
set nat source rule 10 source address '10.42.0.0/16'
set nat source rule 10 translation address 'masquerade'
set interfaces wireguard wg0 address '172.24.32.1/31'
set interfaces wireguard wg0 description 'lab-ptp-vps'
set interfaces wireguard wg0 peer VPS-Lab address '144.202.75.103'
set interfaces wireguard wg0 peer VPS-Lab allowed-ips '172.24.32.0/31'
set interfaces wireguard wg0 peer VPS-Lab allowed-ips '10.42.0.0/16'
set interfaces wireguard wg0 peer VPS-Lab persistent-keepalive '15'
set interfaces wireguard wg0 peer VPS-Lab port '8765'
set interfaces wireguard wg0 peer VPS-Lab pubkey 'lQWPCw1f+B15Au441P2qwue8/YIZ3FLTTW+6N3EzhWM='
set interfaces wireguard wg0 private-key 'Vultr'
set protocols static route 0.0.0.0/0 next-hop 10.21.21.1
set service ssh port '22'
set system host-name 'vyoslab-edge'
Hopefully this should demonstrate where the pubkeys come from:
[email protected]:~$ show wireguard keypairs pubkey Vultr
vzJetiL/M5Ujkb5DiwaG1CMAMr1Ib6a4OGdvlIMNWXs=
VPS Setup
At Vultr, I’ve set up a very simple VyOS config with just the basics to get it online, and the complementary WireGuard config.
- This VPS’s static IP and default route
- Enable SSH
- Set the hostname
- Set up Wireguard
- Uses the opposite IP address, the .0, in the
/31subnet - Uses the pubkey from above.
- Uses the opposite IP address, the .0, in the
[email protected]# run show configuration commands
set interfaces ethernet eth0 address '144.202.75.103/23'
set interfaces loopback lo
set interfaces wireguard wg0 address '172.24.32.0/31'
set interfaces wireguard wg0 description 'lab-ptp-home'
set interfaces wireguard wg0 peer HomeLab allowed-ips '172.24.32.0/31'
set interfaces wireguard wg0 peer HomeLab allowed-ips '10.42.0.0/16'
set interfaces wireguard wg0 peer HomeLab pubkey 'vzJetiL/M5Ujkb5DiwaG1CMAMr1Ib6a4OGdvlIMNWXs='
set interfaces wireguard wg0 port '8765'
set interfaces wireguard wg0 private-key 'Home'
set protocols static route 0.0.0.0/0 next-hop 144.202.74.1
set service ssh port '22'
set system host-name 'vyoslab-vps'
And the key, which will match the Home pubkey config:
[email protected]:~$ show wireguard keypairs pubkey  Home
lQWPCw1f+B15Au441P2qwue8/YIZ3FLTTW+6N3EzhWM=
If you are paying attention, you’ll notice that there is no “endpoint” directive in the WireGuard config on the VPS side.
We are running WireGuard here as a server, instead of a site-to-site.
Even though to WireGuard, it doesn’t care much, it’s worth noting because it has important implications, as hinted above.
In this setup, if you are on the VPS and try and bring up the tunnel, nothing will happen. Because the VPS doesn’t know how to get to the other end. So any traffic needs to originate from the home side, and that’s also why we have the persistent-keepalive on the home side to make sure the tunnel stays up.
So some people may have noticed… I haven’t touched ANYTHING security-wise here.
Honestly, it’s probably outside of the scope of what I’m doing. The local “edge” router is buried so far in my homelab it doesn’t matter. And for the VPS router, I’m sure some people are screaming WHY WHY WHY?
It’s because I’m using Vultr’s firewall to block all traffic from everywhere that’s not me. So calm down.
Tunnels UP!
Assuming you’ve made it this far, your tunnel should be up. A ping should work to the opposite end of the tunnel (home is .1, so ping .0):
[email protected]:~$ ping 172.24.32.0 count 4
PING 172.24.32.0 (172.24.32.0) 56(84) bytes of data.
64 bytes from 172.24.32.0: icmp_seq=1 ttl=64 time=19.9 ms
64 bytes from 172.24.32.0: icmp_seq=2 ttl=64 time=19.3 ms
64 bytes from 172.24.32.0: icmp_seq=3 ttl=64 time=19.3 ms
64 bytes from 172.24.32.0: icmp_seq=4 ttl=64 time=18.8 ms

--- 172.24.32.0 ping statistics ---
4 packets transmitted, 4 received, 0% packet loss, time 8ms
rtt min/avg/max/mdev = 18.768/19.333/19.887/0.419 ms
And a simple op-mode show command:
[email protected]:~$ show interfaces wireguard wg0
interface: wg0
  description: lab-ptp-vps
  address: 172.24.32.1/31
  public key: vzJetiL/M5Ujkb5DiwaG1CMAMr1Ib6a4OGdvlIMNWXs=
  private key: (hidden)
  listening port: 37175

  peer: VPS-Lab
    public key: lQWPCw1f+B15Au441P2qwue8/YIZ3FLTTW+6N3EzhWM=
    latest handshake: 0:01:16
    status: active
    endpoint: 144.202.75.103:8765
    allowed ips: 172.24.32.0/31, 10.42.0.0/16
    transfer: 54 KB received, 251 KB sent
    persistent keepalive: every 15 seconds

    RX:   bytes  packets  errors  dropped  overrun       mcast
          56008      599       0        0        0           0
    TX:   bytes  packets  errors  dropped  carrier  collisions
         257096     5728       0        1        0           0
Route That!
But the goal here isn’t just to set up a tunnel. We actually want to get to LAB1/2 on the home edge router from the VPS.
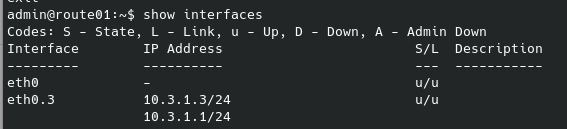
[email protected]:~$ show interfaces
Codes: S - State, L - Link, u - Up, D - Down, A - Admin Down
Interface        IP Address                        S/L  Description
---------        ----------                        ---  -----------
eth0             10.21.21.10/24                    u/u  WAN
eth1             10.42.0.1/24                      u/u  LAB1
eth2             10.42.1.1/24                      u/u  LAB2
lo               127.0.0.1/8                       u/u
                 ::1/128
wg0              172.24.32.1/31                    u/u  lab-ptp-vps
So let’s do that. From the VPS:
[email protected]:~$ ping 10.42.0.1 count 4
PING 10.42.0.1 (10.42.0.1) 56(84) bytes of data.
^C
--- 10.42.0.1 ping statistics ---
4 packets transmitted, 0 received, 100% packet loss, time 87ms
What’s the problem here? Well look at the routing table:
[email protected]:~$ show ip route
Codes: K - kernel route, C - connected, S - static, R - RIP,
       O - OSPF, I - IS-IS, B - BGP, E - EIGRP, N - NHRP,
       T - Table, v - VNC, V - VNC-Direct, A - Babel, D - SHARP,
       F - PBR, f - OpenFabric,
       > - selected route, * - FIB route, q - queued, r - rejected, b - backup

S>* 0.0.0.0/0 [1/0] via 144.202.74.1, eth0, weight 1, 1d00h17m
C>* 144.202.74.0/23 is directly connected, eth0, 1d00h17m
C>* 172.24.32.0/31 is directly connected, wg0, 1d00h17m
Since 10.42.0.1 doesn’t match any subnets in the routing table, it will try to go out the default 0.0.0.0/0 route. This won’t work because private IPs can’t be routed over the public Internet.
Static Routing, The Easy Way Out
There are a few ways around this. A simple static entry for each of the LAB subnets pointed at the home IP of the tunnel (VPS is .0, home is .1):
[email protected]# set protocols static route 10.42.0.0/24 next-hop 172.24.32.1
[edit]
[email protected]# set protocols static route 10.42.1.0/24 next-hop 172.24.32.1
[edit]
[email protected]# commit
Done
[edit]
[email protected]# run show ip route
Codes: K - kernel route, C - connected, S - static, R - RIP,
       O - OSPF, I - IS-IS, B - BGP, E - EIGRP, N - NHRP,
       T - Table, v - VNC, V - VNC-Direct, A - Babel, D - SHARP,
       F - PBR, f - OpenFabric,
       > - selected route, * - FIB route, q - queued, r - rejected, b - backup

S>* 0.0.0.0/0 [1/0] via 144.202.74.1, eth0, weight 1, 1d00h25m
S>* 10.42.0.0/24 [1/0] via 172.24.32.1, wg0, weight 1, 00:00:05
S>* 10.42.1.0/24 [1/0] via 172.24.32.1, wg0, weight 1, 00:00:05
C>* 144.202.74.0/23 is directly connected, eth0, 1d00h25m
C>* 172.24.32.0/31 is directly connected, wg0, 1d00h25m
[edit]
[email protected]#
Of course, this is ugly, and since I deliberately designed the subnets I’m using here to be easily “summarizable”, there’s a VERY simple solution:
[email protected]# delete protocols static route 10.42.0.0/24
[edit]
[email protected]# delete protocols static route 10.42.1.0/24
[edit]
[email protected]# set protocols static route 10.42.0.0/16 next-hop 172.24.32.1
[edit]
[email protected]# commit
[edit]
[email protected]# save
Saving configuration to '/config/config.boot'...
Done
[edit]
[email protected]# run show ip route
Codes: K - kernel route, C - connected, S - static, R - RIP,
       O - OSPF, I - IS-IS, B - BGP, E - EIGRP, N - NHRP,
       T - Table, v - VNC, V - VNC-Direct, A - Babel, D - SHARP,
       F - PBR, f - OpenFabric,
       > - selected route, * - FIB route, q - queued, r - rejected, b - backup

S>* 0.0.0.0/0 [1/0] via 144.202.74.1, eth0, weight 1, 1d00h28m
S>* 10.42.0.0/16 [1/0] via 172.24.32.1, wg0, weight 1, 00:00:09
C>* 144.202.74.0/23 is directly connected, eth0, 1d00h28m
C>* 172.24.32.0/31 is directly connected, wg0, 1d00h28m
In both cases, a simple ping to either the LAB1 or LAB2 address of edge should work from the VPS:
[email protected]# run ping 10.42.0.1 count 2
PING 10.42.0.1 (10.42.0.1) 56(84) bytes of data.
64 bytes from 10.42.0.1: icmp_seq=1 ttl=64 time=18.6 ms
64 bytes from 10.42.0.1: icmp_seq=2 ttl=64 time=19.2 ms

--- 10.42.0.1 ping statistics ---
2 packets transmitted, 2 received, 0% packet loss, time 3ms
rtt min/avg/max/mdev = 18.624/18.908/19.193/0.315 ms
[edit]
[email protected]# run ping 10.42.1.1 count 2
PING 10.42.1.1 (10.42.1.1) 56(84) bytes of data.
64 bytes from 10.42.1.1: icmp_seq=1 ttl=64 time=19.5 ms
64 bytes from 10.42.1.1: icmp_seq=2 ttl=64 time=19.2 ms

--- 10.42.1.1 ping statistics ---
2 packets transmitted, 2 received, 0% packet loss, time 3ms
rtt min/avg/max/mdev = 19.164/19.338/19.512/0.174 ms
[edit]
Now that it’s working, delete it and get back to a clean slate so we can proceed to the BGP:
[email protected]# delete protocols static route 10.42.0.0/16
[edit]
[email protected]# commit
[edit]
[email protected]# run show ip route
Codes: K - kernel route, C - connected, S - static, R - RIP,
       O - OSPF, I - IS-IS, B - BGP, E - EIGRP, N - NHRP,
       T - Table, v - VNC, V - VNC-Direct, A - Babel, D - SHARP,
       F - PBR, f - OpenFabric,
       > - selected route, * - FIB route, q - queued, r - rejected, b - backup

S>* 0.0.0.0/0 [1/0] via 144.202.74.1, eth0, weight 1, 1d00h56m
C>* 144.202.74.0/23 is directly connected, eth0, 1d00h56m
C>* 172.24.32.0/31 is directly connected, wg0, 1d00h56m
BGP, The Slightly Less Easy Way Out
So why not just static routing? It works right? Well it does… but has a number of notable problems:
- Requires planning. Especially if you want to judiciously use summary routes
- Could potentially require a lot of upkeep as your network grows and morphs.
- It’s not BGP, which is just cool.
With the first one, who ever plans? I know I don’t. I’d rather adjust config on one or two routers than all of them.
Regardless, we are here to BGP, so let’s do it.
If you don’t know what BGP is, you should Google it. There are 1000 different resources that will explain it better than me.
There are two main types, internal and external (eBGP), and we are going to be focusing on external, because it’s bit more plug-and-play.
An ASN, or Autonomous System Number, is an important concept when it comes to eBGP. When you are announcing public subnets, you need an officially blessed ASN from a place like ARIN, but for our uses, there are a number of for-private ranges we can use:
- 64512 to 65534 (16 bit)
- 4200000000 to 4294967294 (32 bit)
The ASNs are used both for identification and routing decisions. If I wanted to make a route take a shorter route sometimes and a longer one that others, I could have the ASN PATH in BGP set to “64512 64512 64512” on one peer versus just “64512” on a second. This would give preference to the shorter path.
Does it really matter if you use a non-private one? Probably not. And for our cases it will hurt even less than wrongly using non-RFC1918 addresses that people sometimes do in homelabs. But it’s still good practice to be a good netizen out of the gate.
Home Setup
I’ll be starting with the Home setup, since that will be kind of the central hub here. First, start with the basic peering:
[email protected]:~$ show configuration commands
set protocols bgp local-as '4200000000'
set protocols bgp neighbor 172.24.32.0 remote-as '4200000001'
I’ll be going with a very basic setup here, just setting up the initial tunnel.
Let’s walk through here to see what’s going on:
- Set our local ASN. For
edge, I’ll be using the bottom 32bit private ASN - Set up our neighbor, this is the
vpsIP over wireguard, the next available 32bit ASN
VPS Setup
On the VPS, a similarly simple config, with everything swapped. We use the edge side of the WireGuard tunnel, and swap the appropriate local and remote ASN.
[email protected]# run show configuration commands
set protocols bgp local-as '4200000001'
set protocols bgp neighbor 172.24.32.1 remote-as '4200000000'
With that, the tunnel should be up. In op-mode:
[email protected]:~$ show bgp summary

IPv4 Unicast Summary:
BGP router identifier 172.24.32.1, local AS number 4200000000 vrf-id 0
BGP table version 0
RIB entries 0, using 0 bytes of memory
Peers 1, using 21 KiB of memory

Neighbor        V         AS   MsgRcvd   MsgSent   TblVer  InQ OutQ  Up/Down State/PfxRcd   PfxSnt
172.24.32.0     4 4200000001        15        15        0    0    0 00:12:27            0        0

Total number of neighbors 1
[email protected]:~$
and
[email protected]# run show bgp summary

IPv4 Unicast Summary:
BGP router identifier 172.24.32.0, local AS number 4200000001 vrf-id 0
BGP table version 0
RIB entries 0, using 0 bytes of memory
Peers 1, using 21 KiB of memory

Neighbor        V         AS   MsgRcvd   MsgSent   TblVer  InQ OutQ  Up/Down State/PfxRcd   PfxSnt
172.24.32.1     4 4200000000        16        16        0    0    0 00:14:00            0        0

Total number of neighbors 1
[edit]
The important things to note is that the ASN and neighbor IP get swapped on each host.
Of course, we need a few small modifications to actually get things advertising.
First, we need to tell the home edge to advertise its connected routes. This means that we want to redistribute any routes from this router that are attached to interfaces:
[email protected]:~$ show configuration commands
set protocols bgp address-family ipv4-unicast redistribute connected
and then on the VPS router to pull any updates instantly:
[email protected]# set protocols bgp neighbor 172.24.32.1 address-family ipv4-unicast soft-reconfiguration inbound
[edit]
[email protected]# commit
With that done, if you look on the vps router, you can see stuff happening:
[email protected]:~$ show bgp summary

IPv4 Unicast Summary:
BGP router identifier 172.24.32.0, local AS number 4200000001 vrf-id 0
BGP table version 8
RIB entries 9, using 1728 bytes of memory
Peers 1, using 21 KiB of memory

Neighbor        V         AS   MsgRcvd   MsgSent   TblVer  InQ OutQ  Up/Down State/PfxRcd   PfxSnt
172.24.32.1     4 4200000000        51        40        0    0    0 00:33:36            5        5

Total number of neighbors 1
So let’s look at our routing table on vps:
[email protected]:~$ show ip route
Codes: K - kernel route, C - connected, S - static, R - RIP,
       O - OSPF, I - IS-IS, B - BGP, E - EIGRP, N - NHRP,
       T - Table, v - VNC, V - VNC-Direct, A - Babel, D - SHARP,
       F - PBR, f - OpenFabric,
       > - selected route, * - FIB route, q - queued, r - rejected, b - backup

S>* 0.0.0.0/0 [1/0] via 144.202.74.1, eth0, weight 1, 00:37:57
B>* 10.21.21.0/24 [20/0] via 172.24.32.1, wg0, weight 1, 00:13:12
B>* 10.42.0.0/24 [20/0] via 172.24.32.1, wg0, weight 1, 00:13:12
B>* 10.42.1.0/24 [20/0] via 172.24.32.1, wg0, weight 1, 00:13:12
C>* 144.202.74.0/23 is directly connected, eth0, 00:38:03
B   172.24.32.0/31 [20/0] via 172.24.32.1 inactive, weight 1, 00:13:12
C>* 172.24.32.0/31 is directly connected, wg0, 00:38:00
If everything is working, any route that exists on our edge‘s routing table as “directly connected”, should be found on our vps‘s routing table going over the WireGuard tunnel.
You can test this by adding a new dummy interface on the edge router:
[email protected]# set interfaces dummy dum0 address 172.22.22.255/32
[edit]
[email protected]# commit
Almost immediately, you should see it pop up in the routing table on the vps, but it won’t be pingable because it’s not part of the allowed-ips of the WireGuard tunnel:
[email protected]:~$ show ip route 172.22.22.255/32
Routing entry for 172.22.22.255/32
  Known via "bgp", distance 20, metric 0, best
  Last update 00:00:36 ago
  * 172.24.32.1, via wg0, weight 1


[email protected]:~$ ping 172.22.22.255
PING 172.22.22.255 (172.22.22.255) 56(84) bytes of data.
From 172.24.32.0 icmp_seq=1 Destination Host Unreachable
ping: sendmsg: Required key not available
From 172.24.32.0 icmp_seq=2 Destination Host Unreachable
ping: sendmsg: Required key not available
^C
--- 172.22.22.255 ping statistics ---
2 packets transmitted, 0 received, +2 errors, 100% packet loss, time 54ms
Now the real fun can start….
BGeeeeeP All The Things
So if you’ve been following along, we’ve completed the top part of our diagram here:
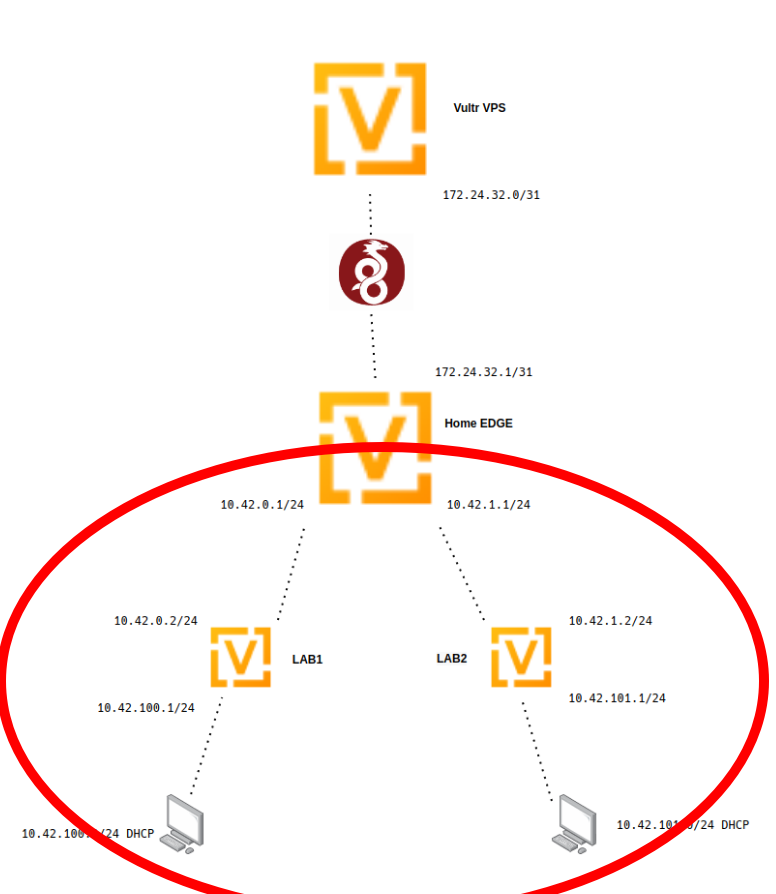
It’s time to get our LAB1 and LAB2 routers up.
A Pair of Internal-Internal Routers
The first thing I’ll be doing is preparing the edge router to connect to lab1 and lab2:
- Set up a neighbor pointing at
lab1. default-originatetells this router to automatically set the default route forlab1to this router- As before, pull updates from
lab1quickly - Set the next ASN in line
- Rinse and repeat for
lab2
set protocols bgp neighbor 10.42.0.2 address-family ipv4-unicast default-originate
set protocols bgp neighbor 10.42.0.2 address-family ipv4-unicast soft-reconfiguration inbound
set protocols bgp neighbor 10.42.0.2 remote-as '4200000002'
set protocols bgp neighbor 10.42.1.2 address-family ipv4-unicast default-originate
set protocols bgp neighbor 10.42.1.2 address-family ipv4-unicast soft-reconfiguration inbound
set protocols bgp neighbor 10.42.1.2 remote-as '4200000003'
The configs for these two are mostly identical. Note the changes in IP addresses and ASNs
- I’m using a slightly different method of advertising on
lab2. Instead of redistributing any connected network, I’m choosing the specific network to spit out. - I’ve set up some DHCP Servers. This is so I can just plug in a client and go for testing
- I’ve also ignored setting up any source NAT. This is so I can directly access the 100/101 networks from the VPS.
- Note that both of these are missing the
0.0.0.0/0default route/gateway. This is because they are learning it via BGP.
LAB1
[email protected]:~$ show configuration commands
set interfaces ethernet eth0 address '10.42.0.2/24'
set interfaces ethernet eth1 address '10.42.100.1/24'
set interfaces loopback lo
set protocols bgp address-family ipv4-unicast redistribute connected
set protocols bgp local-as '4200000002'
set protocols bgp neighbor 10.42.0.1 address-family ipv4-unicast soft-reconfiguration inbound
set protocols bgp neighbor 10.42.0.1 remote-as '4200000000'
set service dhcp-server shared-network-name LAB1 subnet 10.42.100.0/24 default-router '10.42.100.1'
set service dhcp-server shared-network-name LAB1 subnet 10.42.100.0/24 dns-server '1.1.1.1'
set service dhcp-server shared-network-name LAB1 subnet 10.42.100.0/24 dns-server '1.0.0.1'
set service dhcp-server shared-network-name LAB1 subnet 10.42.100.0/24 range 0 start '10.42.100.100'
set service dhcp-server shared-network-name LAB1 subnet 10.42.100.0/24 range 0 stop '10.42.100.200'
set service ssh port '22'
set system host-name 'vyoslab-lab1'
LAB2
[email protected]:~$ show configuration commands
set interfaces ethernet eth0 address '10.42.1.2/24'
set interfaces ethernet eth1 address '10.42.101.1/24'
set interfaces loopback lo
set protocols bgp address-family ipv4-unicast network 10.42.101.0/24
set protocols bgp local-as '4200000003'
set protocols bgp neighbor 10.42.1.1 address-family ipv4-unicast soft-reconfiguration inbound
set protocols bgp neighbor 10.42.1.1 remote-as '4200000000'
set service dhcp-server shared-network-name LAB2 subnet 10.42.101.0/24 default-router '10.42.101.1'
set service dhcp-server shared-network-name LAB2 subnet 10.42.101.0/24 dns-server '1.1.1.1'
set service dhcp-server shared-network-name LAB2 subnet 10.42.101.0/24 dns-server '1.0.0.1'
set service dhcp-server shared-network-name LAB2 subnet 10.42.101.0/24 range 0 start '10.42.101.100'
set service dhcp-server shared-network-name LAB2 subnet 10.42.101.0/24 range 0 stop '10.42.101.200'
set service ssh port '22'
set system host-name 'vyoslab-lab2'
Assuming everything is set up right, the BGP connections should pop up and be viewable from edge. Note the different counts in State/PfxRcd between lab1 and lab2. This is due to how I chose to advertise as mentioned above.
[email protected]:~$ show ip bgp summary

IPv4 Unicast Summary:
BGP router identifier 172.24.32.1, local AS number 4200000000 vrf-id 0
BGP table version 18
RIB entries 11, using 2112 bytes of memory
Peers 3, using 64 KiB of memory

Neighbor        V         AS   MsgRcvd   MsgSent   TblVer  InQ OutQ  Up/Down State/PfxRcd   PfxSnt
10.42.0.2       4 4200000002       131       139        0    0    0 01:22:18            2        6
10.42.1.2       4 4200000003       129       143        0    0    0 01:21:56            1        6
172.24.32.0     4 4200000001       123       122        0    0    0 01:33:50            0        6
And the routing table all the way out on the vps should be populated and pingable with the two new subnets:
[email protected]:~$ show ip route
Codes: K - kernel route, C - connected, S - static, R - RIP,
       O - OSPF, I - IS-IS, B - BGP, E - EIGRP, N - NHRP,
       T - Table, v - VNC, V - VNC-Direct, A - Babel, D - SHARP,
       F - PBR, f - OpenFabric,
       > - selected route, * - FIB route, q - queued, r - rejected, b - backup

S>* 0.0.0.0/0 [1/0] via 10.21.21.1, eth0, weight 1, 01:37:31
C>* 10.21.21.0/24 is directly connected, eth0, 01:37:33
C>* 10.42.0.0/24 is directly connected, eth1, 01:37:34
C>* 10.42.1.0/24 is directly connected, eth2, 01:37:33
B>* 10.42.100.0/24 [20/0] via 10.42.0.2, eth1, weight 1, 00:04:04
B>* 10.42.101.0/24 [20/0] via 10.42.1.2, eth2, weight 1, 01:25:05
C>* 172.24.32.0/31 is directly connected, wg0, 01:37:32

------------

[email protected]:~$ ping 10.42.100.1 count 1
PING 10.42.100.1 (10.42.100.1) 56(84) bytes of data.
64 bytes from 10.42.100.1: icmp_seq=1 ttl=64 time=0.264 ms

--- 10.42.100.1 ping statistics ---
1 packets transmitted, 1 received, 0% packet loss, time 0ms
rtt min/avg/max/mdev = 0.264/0.264/0.264/0.000 ms

--------------

[email protected]:~$ ping 10.42.101.1 count 1
PING 10.42.101.1 (10.42.101.1) 56(84) bytes of data.
64 bytes from 10.42.101.1: icmp_seq=1 ttl=64 time=10.7 ms

--- 10.42.101.1 ping statistics ---
1 packets transmitted, 1 received, 0% packet loss, time 0ms
rtt min/avg/max/mdev = 10.711/10.711/10.711/0.000 ms
Playing around with Clients
Whew… We’ve made it this far. So what can we do?
First off, a pair of basic Ubuntu installs. One behind lab1 and one behind lab2:
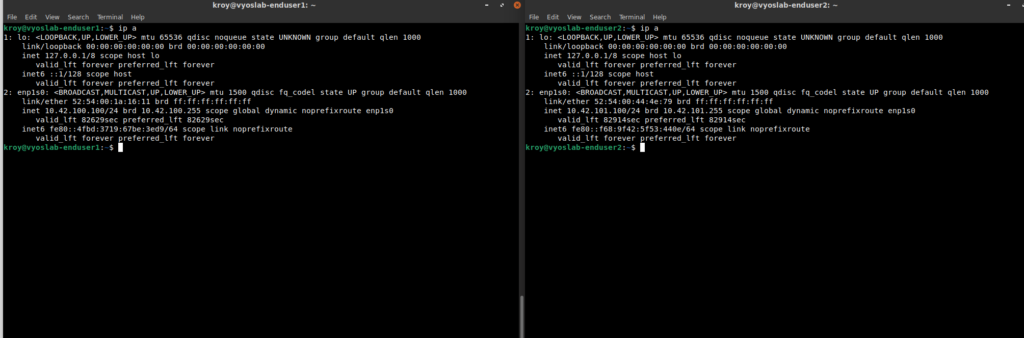
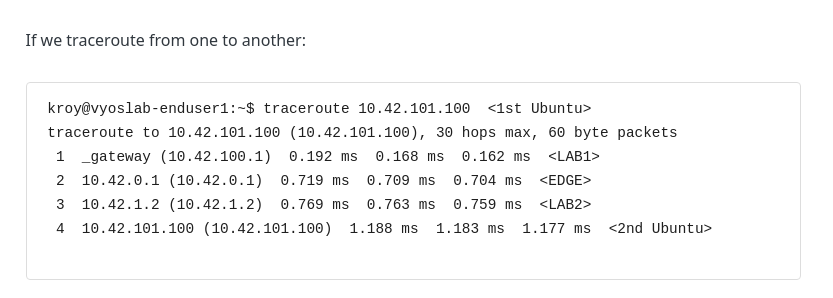
If we traceroute from one to another:
[email protected]:~$ traceroute 10.42.101.100  <1st Ubuntu>
traceroute to 10.42.101.100 (10.42.101.100), 30 hops max, 60 byte packets
 1  _gateway (10.42.100.1)  0.192 ms  0.168 ms  0.162 ms
 2  10.42.0.1 (10.42.0.1)  0.719 ms  0.709 ms  0.704 ms
 3  10.42.1.2 (10.42.1.2)  0.769 ms  0.763 ms  0.759 ms
 4  10.42.101.100 (10.42.101.100)  1.188 ms  1.183 ms  1.177 ms  <2nd Ubuntu>
What about if we go from the vps to one of the Ubuntu installs:
[email protected]:~$ traceroute 10.42.101.100
traceroute to 10.42.101.100 (10.42.101.100), 30 hops max, 60 byte packets
 1  172.24.32.1 (172.24.32.1)  18.453 ms  18.367 ms  18.378 ms
 2  10.42.1.2 (10.42.1.2)  18.343 ms  18.308 ms  18.275 ms
 3  10.42.101.100 (10.42.101.100)  18.250 ms  18.211 ms  18.178 ms   <2nd Ubuntu>
To a well-known site:
[email protected]:~$ traceroute 1.1.1.1
traceroute to 1.1.1.1 (1.1.1.1), 30 hops max, 60 byte packets
 1  _gateway (10.42.100.1)  0.220 ms  0.183 ms  0.176 ms
 2  10.42.0.1 (10.42.0.1)  0.379 ms  0.372 ms  0.362 ms
 3  10.21.21.3 (10.21.21.3)  1.206 ms  1.200 ms  1.193 ms
 4  10.245.245.9 (10.245.245.9)  1.255 ms  1.249 ms  1.236 ms
 5  xxxxxxxxxxxxxxxxxxxxxxxxxxx 2.658 ms  2.651 ms  2.639 ms
 6  xxxxxxxxxxxxxxxxxxxxxxxxxxx 5.195 ms  3.781 ms  4.081 ms
 7  xxxxxxxxxxxxxxxxxxxxxxxxxxx  4.069 ms  4.646 ms  4.626 ms
 8  xxxxxxxxxxxxxxxxxxxxxxxxxxx.191 ms  4.610 ms  4.600 ms
 9  100ge15-2.core1.mci3.he.net (184.105.65.165)  8.474 ms  9.064 ms  8.443 ms
10  cloudflare.grand1.kcix.net (206.51.7.34)  9.040 ms  10.013 ms  9.385 ms
11  one.one.one.one (1.1.1.1)  9.415 ms  8.984 ms  8.106 ms
A Policy Route
Of course, all we’ve really done here is set up basic communication between a number of subnets at multiple locations. So let’s toss some PBR (Policy Based Routing) into the mix.
The first step is to make sure vps is set up to NAT out. This is:
- Take all traffic from this subnet
- Masquerade it to the public IP of the VPS
eth0is the WAN interface of the VPS
[email protected]:~$ show configuration commands
set nat source rule 10 source address '10.42.100.0/24'
set nat source rule 10 translation address 'masquerade'
set nat source rule 10 outbound-interface 'eth0'
Then, on edge is where all the magic happens. The goal here is to put all traffic from/to the 10.42.100.0/24 subnet, into a separate routing table. That way we can tell all the 0.0.0.0/0 traffic to leave this router via the WireGuard/VPS connection.
- Set up a policy route. This puts all traffic to and from in a separate routing table,
100 - Tie a specific route for
0.0.0.0/0to that table, and tell it to go out via thevpsWireGuard IP - Allow all traffic through WireGuard on this end. Otherwise WireGuard will deny traffic to everywhere
- Attach the new policy to the interface the traffic will be coming in on.
[email protected]:~$ show configuration commands
set policy route OUTGOING-VPS rule 100 set table '100'
set policy route OUTGOING-VPS rule 100 source address '10.42.100.0/24'
set policy route OUTGOING-VPS rule 101 destination address '10.42.100.0/24'
set policy route OUTGOING-VPS rule 101 set table '100'
set protocols static table 100 route 0.0.0.0/0 next-hop 172.24.32.0
set interfaces wireguard wg0 peer VPS-Lab allowed-ips '0.0.0.0/0'
set interfaces ethernet eth1 policy route 'OUTGOING-VPS'
Once that is complete, you should be accessing the web through the VPS. Note the VPS IP in the curl, and the dramatically different path than the one it took above.
[email protected]:~$ curl ifconfig.co
144.202.75.103

[email protected]:~$ traceroute 1.1.1.1
traceroute to 1.1.1.1 (1.1.1.1), 30 hops max, 60 byte packets
 1  _gateway (10.42.100.1)  0.221 ms  0.195 ms  0.189 ms
 2  10.42.0.1 (10.42.0.1)  0.421 ms  0.415 ms  0.406 ms
 3  172.24.32.0 (172.24.32.0)  19.710 ms  20.094 ms  20.088 ms
 4  * * *
 5  vl199-ds1-b5-02.05.dal4.constant.com (108.61.111.1)  23.403 ms  26.589 ms  29.625 ms
 6  * * *
 7  * * *
 8  ae-31.a01.dllstx09.us.bb.gin.ntt.net (128.241.219.53)  19.701 ms * 8-1-5.ear1.Dallas3.Level3.net (4.15.38.133)  19.719 ms
 9  ae-31.a01.dllstx09.us.bb.gin.ntt.net (128.241.219.53)  19.682 ms 8-1-5.ear1.Dallas3.Level3.net (4.15.38.133)  19.726 ms  19.721 ms
10  ae11.cr8-dal3.ip4.gtt.net (213.200.115.30)  19.877 ms ip4.gtt.net (208.116.142.210)  19.950 ms ae-6.r10.dllstx09.us.bb.gin.ntt.net (129.250.5.4)  19.623 ms
11  ip4.gtt.net (208.116.142.210)  20.130 ms  20.148 ms cloudflare-ic328260-dls-b23.ip.twelve99-cust.net (62.115.61.243)  20.989 ms
12  one.one.one.one (1.1.1.1)  19.788 ms  20.716 ms  20.428 ms
Once this is working, you could set up a web server on this IP and access it via the VPS.
OOOPS…
Unfortunately, we’ve create a bit of a mistake. Remember this from above?
The path looks waaaay different now:
[email protected]:~$ traceroute 10.42.101.100   <1st Ubuntu>
traceroute to 10.42.101.100 (10.42.101.100), 30 hops max, 60 byte packets
 1  _gateway (10.42.100.1)  0.215 ms  0.201 ms  0.196 ms
 2  10.42.0.1 (10.42.0.1)  0.357 ms  0.700 ms  0.694 ms
 3  172.24.32.0 (172.24.32.0)  19.082 ms  19.076 ms  19.142 ms
 4  172.24.32.1 (172.24.32.1)  19.135 ms  19.129 ms  19.264 ms
 5  10.42.1.2 (10.42.1.2)  19.504 ms  19.494 ms  19.488 ms
 6  10.42.101.100 (10.42.101.100)  19.717 ms  19.680 ms  19.654 ms <2nd Ubuntu>
The policy based routing has created a bit of a weird path. In fact, we are a bit lucky it can find a path at all.
Fortunately, this is easily fixable on edge:
- When traffic from our “re-routed” network tries to hit anything in the
10.0.0.0/8network (another summary route for the networks I use here and in the rest of my lab), put the traffic back in themainrouting table.
[email protected]:~$ show configuration commands
set policy route OUTGOING-VPS rule 90 destination address '10.0.0.0/8'
set policy route OUTGOING-VPS rule 90 set table 'main'
And once more the traceroute looks normal AND the rest of the traffic is still being routed though the VPS:
[email protected]:~$ traceroute 10.42.101.100
traceroute to 10.42.101.100 (10.42.101.100), 30 hops max, 60 byte packets
 1  _gateway (10.42.100.1)  0.286 ms  0.233 ms  0.227 ms
 2  10.42.0.1 (10.42.0.1)  0.429 ms  0.423 ms  0.413 ms
 3  10.42.1.2 (10.42.1.2)  0.732 ms  0.726 ms  0.720 ms
 4  10.42.101.100 (10.42.101.100)  0.964 ms  0.949 ms  0.937 ms

[email protected]:~$ curl ifconfig.co
144.202.75.103
Caveats
Even though I’m at almost 5000 words on this post already, I fully acknowledge this will end with a LOT of basics missing:
- At any point in this whole thing,”insert security”. This is all very wide open and would be a bad idea to implement without some security controls in place.
- You would need to set up access/as-path/communities/prefix -lists and route-maps to fine tune what you are announcing and accepting. Right now, everything that was built is basically “Announce Everything and Accept Everything!”. This is bad in so many ways, and on the public Internet, has actually broken big parts of the Internet because some network engineer announced or accepted a prefix they shouldn’t have.
- None of this even scratches the surface of what BGP can do. You can build up failover and redundancy, make routing decisions based on tons of factors and more.
- I could write 20 more posts of equal or more length and still barely demonstrate beyond the basics, especially when it comes to best-practices (of which there weren’t many here), or capabilities of BGP.
Conclusion
Even with the caveats mentioned, hopefully this post will set some people on the path of learning and enjoying routing. It’s been a long one, but I’ve enjoyed labbing it out.