Something that comes up quite often is “how do I announce subnets”. This is when you own at least a /24 IPv4 or /48 in IPv6 (the minimum subnet sizes that can be announced), and want to make it publicly accessible to the rest of the world. In this edition, we’ll walk through the logistics of subnet announcement on a basic level.
Introduction
On the Internet, you know you’ve made it when you have a subnet to announce.
Either you paid an exorbitant sum to buy one yourself, or are leasing/borrowing a subnet from a LIR/RIR (local or regional Internet Registry), having your own subnet in your homelab is definitely a bit of a status symbol.
Of course, once you have the subnet, what do you do with it? You announce it with BGP of course!
Announcement
To put simply, announcement is you telling the world where and how to get to your subnet. Whether you have an IPv4 subnet, IPv6, or both, the procedure is the identical.
If you’ve got some sort of business-class Internet, you just need to send your ISP the LOA (letter of authorization from your LIR/RIR), and they should begin announcing for you.
Now if you are just a regular homelab user with a conventional residential ISP, congrats! You are just like me.
A residential ISP won’t even talk to you, so you need to trackdown a VPS that will do your announcing for you.
I prefer Vultr (this is a referral link or click HERE for non-referral link). For $5 a month, you can get a VPS that will have no problem announcing one or many subnets.
I’m also just going over basics here, as there are TONS of things that go into this to complicate it further. As mentioned, announcing IPv6 subnets is identical to IPv4. And different LIR/RIRs have different rules about what you are required to do with the subnet, like multi-homing.
VPS Setup
I don’t want to waste TOO much time on the non-BGPy parts of VPS. But if you read my first article on this, the basic setup is straightforward:
firewall {
    all-ping enable
    broadcast-ping disable
    config-trap disable
    ipv6-receive-redirects disable
    ipv6-src-route disable
    ip-src-route disable
    log-martians enable
    name WAN-LOCAL {
        rule 10 {
            action accept
            destination {
                port ssh
            }
            protocol tcp
            source {
                address homeIP/32
            }
        }
        rule 20 {
            action drop
        }
    }
    receive-redirects disable
    send-redirects enable
    source-validation disable
    state-policy {
        established {
            action accept
        }
        invalid {
            action drop
        }
        related {
            action accept
        }
    }
    syn-cookies enable
    twa-hazards-protection disable
}
interfaces {
    ethernet eth0 {
        address VultrPublicIP/23
        firewall {
            local {
                name WAN-LOCAL
            }
        }
    }
    loopback lo {
    }
    tunnel tun0 {
        address 172.27.114.1/30
        encapsulation gre
        local-ip VultrPublicIP
        remote-ip HomeIP
    }
}

protocols {
    static {
        route 0.0.0.0/0 {
            next-hop VultrGateway {
            }
        }
    }
}
service {
    ssh {
        disable-password-authentication
        port 22
    }
}


system {
    config-management {
        commit-revisions 100
    }
    host-name vyos
    login {
        user kroy {
            authentication {
                public-keys [email protected] {
                    key ****************
                    type ssh-ed25519
                }
            }
        }
    }
    name-server 1.1.1.1
    name-server 1.0.0.1
    ntp {
        server 0.pool.ntp.org {
        }
        server 1.pool.ntp.org {
        }
        server 2.pool.ntp.org {
        }
    }
    syslog {
        global {
            facility all {
                level info
            }
            facility protocols {
                level debug
            }
        }
    }
}
Most of this should be fairly straightforward:
- A firewall to drop all packets, except for SSH from my home IP
- My public ethernet setup for the VPS
- A simple GRE tunnel to my Home IP. This is where the BGP session is going to transit to actually contact the public servers on my homelab.
- A static route to define the default route for the VPS. Not strictly necessary since I’ll be BGP peering with Vultr, but it makes it easier to configure everything over SSH.
- Making SSH accessible on port 22 and forcing key-auth.
- Some system-y setup things. System name-servers, key-based ssh auth, etc.
BGP
The next step is to look up your BGP on Vultr. After Vultr has accepted your LOA, you’ll have a new BGP tab in your VPS settings
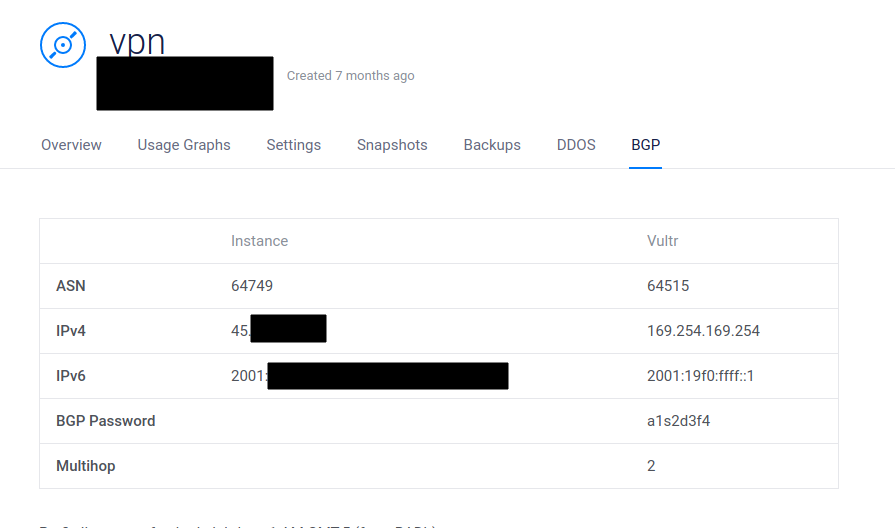
These are basically all the things you’ll need to know to hook up a BGP session to Vultr.
Throughout this document, I’m going to pretend to advertise 10.100.0.0/22, even though that’s a private subnet per RFC1918 and could never be advertised.
This is all for example and WILL NOT WORK if you try and do this for real.
So what does this look like on the VPS in the protocols bgp config?
The numbers like 64537 are what are known as ASNs, or Autonomous System Numbers. In the real world, you’d get your own individual number that would tie the ASN to you or your company.
If you don’t have your own ASN, you’ll be using what are known as “Private ASN Numbers”, per RFC6996.
For my example, I chose at random, while a few of them need to line up to what Vultr provided.
protocols {
    bgp 64537 {
        address-family {
            ipv4-unicast {
                aggregate-address 10.100.0.0/22 {
                }
            }
        }
        neighbor 169.254.169.254 {
            address-family {
                ipv4-unicast {
                    nexthop-self {
                        force
                    }
                    prefix-list {
                        import IPV4DENYALL
                    }
                    remove-private-as
                    route-map {
                        export V4-VULTR-ANNOUNCE
                    }
                }
            }
            ebgp-multihop 255
            local-as 64749 {
            }
            password a1s2d3f4
            remote-as 64515
        }
        parameters {
            router-id VultrPublicIP
        }
    }
As mentioned, a few of things items are just “fill in the dots” to create a session with Vultr. The ebgp-multihop is just a number that must be “at most this many hops away”. So as long as it’s >=2 that Vultr provided, 255 is fine.
I chose to advertise a /22 here for a reason. This means I could have a /24 from one location, and a /23 from a different location, and advertise them both from a single spot.
The remove-private-as will be important when we set up our connection to home. Otherwise, Vultr will fail to accept our advertisement, because it sees an ASN in the path that it doesn’t recognize.
The route-map and prefix-list are part of being a good netizen and only accepting and advertising the prefixes you want. There have been some MAJOR Internet outages because some network engineer messed up routes it was accepting or advertising somehow.
Route maps and Prefix lists
It’s important to focus on what the route maps and prefix lists are doing here. As mentioned, they control what your in and out announcements are going to be. It’s worth noting that someone like Vultr probably won’t let you do anything too bad, it’s still good to learn how to set it up somewhat securely first.
policy {
    prefix-list IPV4DENYALL {
        rule 10 {
            action deny
            prefix 0.0.0.0/0
        }
    }
    prefix-list V4-VULTR {
        rule 10 {
            action permit
            prefix 10.100.0.0/22
        }
        rule 20 {
            action deny
            le 32
            prefix 0.0.0.0/0
        }
    }
    prefix-list VULTR {
        rule 10 {
            action permit
            prefix 10.100.0.0/24
        }
        rule 20 {
            action deny
            prefix 0.0.0.0/0
        }
    }
    route-map V4-VULTR {
        rule 10 {
            action permit
            match {
                ip {
                    address {
                        prefix-list V4-VULTR
                    }
                }
            }
        }
    }
}
Where these are positioned in relation to the export/import in the peer config above, control what happens. So in this case we want to:
- IPV4DenyAll: ignore anything from Vultr. You can tell them to give you full tables, but unless you have an instance with slightly more RAM, full tables would probably be a bit too much for this VPS. This would basically be the routes for EVERY network on the Internet.
- VULTR Route maps and prefix lists: Advertise ONLY the subnet we want. This is for when you want to advertise different subnets to different peers. It also stops you from leaking your routes in case of a misconfiguration somewhere.
Now in op-mode, showing the BGP neighbors should give you a bunch of information:
[email protected]:~$ show ip bgp neighbors 169.254.169.254 
and you should see the subnet being advertised:
[email protected]:~$ show ip bgp neighbors 169.254.169.254 advertised-routes
BGP table version is 7, local router ID is 45.xx.xx.xx, vrf id 0
Default local pref 100, local AS 64537
Status codes:  s suppressed, d damped, h history, * valid, > best, = multipath,
               i internal, r RIB-failure, S Stale, R Removed
Nexthop codes: @NNN nexthop's vrf id, < announce-nh-self
Origin codes:  i - IGP, e - EGP, ? - incomplete

   Network          Next Hop            Metric LocPrf Weight Path
*> 10.100.0.0/24   0.0.0.0                       100      0 i

Total number of prefixes 1
BGP at Home
The final bit of this puzzle is completing the BGP session to your home, and getting up some hosts:
We can add another neighbor, which uses the opposite end of the GRE tunnel for the BGP peer. Still on the VPS:
protocols {
    bgp 64537 {
        neighbor 172.27.114.2 {
            address-family {
                ipv4-unicast {
                    prefix-list {
                        export IPV4DENYALL
                    }
                    route-map {
                        import V4-VULTR
                    }
                    soft-reconfiguration {
                        inbound
                    }
                }
            }
            remote-as 64537
        }

    }
}
Note that there are a few important things going on here:
- The
export/importare reversed, so I can reuse the same policies. That means, I want to make sure I’m importing only the subnet I want from home, and not exporting anything. - The
soft-reconfiguration inbound. This is the statement that tells VyOS to accept the routes that the home server is advertising. - The
bgp 64537andremote-as 64537are the same. This triggers the use of IBGP instead of EBGP (internal vs external). This becomes important as you add more hosts and want to advertise from more locations, but is beyond the scope of this post.
At this point, all the prep work on the VPS should be done, and once the home router is configured, you should be advertising your subnet.
Home
At home, the first thing is to get the GRE tunnel working. You can use almost any transport, like WireGuard or an L3 OpenVPN, but for advertising a simple subnet, GRE is about as easy as it gets, plus it avoids some potential MTU shenanigans.
You might need to add appropriate firewall rules:
WAN->LOCAL firewall:

 rule 2 {
     action accept
     description "GRE to VPS"
     protocol gre
     source {
         address VultrPublicIP
     }
     state {
         invalid enable
         new enable
     }
 }

interfaces:
tunnel tun2 {
     address 172.27.114.2/30
     description vultr-gre
     encapsulation gre
     local-ip HomePublicIP
     multicast disable
     remote-ip VultrPublicIP
 }
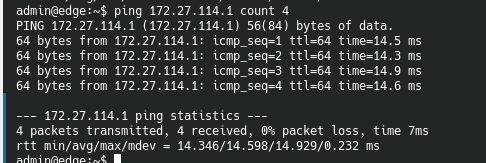
Depending on your firewall config, you might want to drop (in my case) tun2 in the appropriate zone, Barring any issues, pinging to the other end of the tunnel should immediately start working:
Home Config
Now there are a number of different directions one can take for advertising the subnet from your home to the VPS. OSPF, static routes, or my favorite, BGP.
For just running a simple subnet out of your home, you’ll want to assign an IP in that subnet to your home VyOS install. In my case, I assign it to a vlan, but you could assign it to a separate interface like eth4:
[email protected]# show interfaces ethernet eth0 vif 146
 address 10.100.0.1/24
 policy {
     route VULTRSTUFF
 }
Now, anything on that VLAN that gets assigned a 10.100.0.0/24 address can use 10.100.0.1 for its gateway and have access on the advertised subnet (once we set up BGP at home).
You’ll also note I have a policy route here. This is to ensure that the traffic doesn’t leak out my WAN, which will result in an asymmetric routing situation where my advertised subnet doesn’t work.
Policy based routing sets up rules that say: “Take any traffic that matches these rules, and put them in different routing tables to ensure they can’t go out the wrong interface”.
policy route VULTRSTUFF {
    rule 9 {
        destination {
            group {
                network-group PRIVATE-NETWORKS
            }
        }
        set {
            table main
        }
        source {
            address 10.100.0.0/24
        }
    }
    rule 10 {
        set {
            table 146
        }
        source {
            address 10.100.0.0/24
        }
    }
    rule 20 {
        destination {
            address 10.100.0.0/24
        }
        set {
            table 146
        }
    }
}
So with above:
- Rule 9: Any traffic from our announced subnet trying to get to the local private networks, put back in the main routing table. This is so my announced hosts can access my LAN. This is known as “leaking routes”.
- Take any traffic from my announced subnet and put it in a different table. The number is arbitrary but in this case
146. - Take any traffic destined TO my announced subnet to put it in the different table. Again
146.
Now that we have traffic in a separate routing table, we need to have a way for the traffic to actually go somewhere useful, namely, our GRE tunnel:
protocols static table 146 {
     interface-route 0.0.0.0/0 {
         next-hop-interface tun2 {
         }
     }
 }
This just tells VyOS to put ALL traffic on table 146 over the tun2 interface, which is the GRE connection to the VPS. With a recent version of rolling VyOS, this can all be done with some VRF antics as well.
BGP
The final piece of this puzzle is setting up BGP on the server at home. It looks much like the setup on the VPS, just with the opposite neighbor address and reversed route/prefixes, so we are accepting none, and only advertising the appropriate subnet. This is important because you won’t always have control of both ends of the BGP link, so you don’t want to trust someone else’s work.
 bgp 64537 {
     address-family {
         ipv4-unicast {
             network 10.100.1.0/24 {
             }
         }
     }
  neighbor 172.27.114.1 {
         address-family {
             ipv4-unicast {
                 prefix-list {
                     import DENY-ALL-V4
                 }
                 route-map {
                     export V4-VULTR
                 }
                 route-server-client
             }
         }
         remote-as 64537
         update-source 172.27.112.2
     }
}
As before, we are using IBGP (the 64537 matches both locally and the remote), denying any incoming advertisements, and only allowing our outgoing advertisement:
[email protected]# show policy
 prefix-list DENY-ALL-V4 {
     rule 10 {
         action deny
         le 32
         prefix 0.0.0.0/0
     }
 }
 prefix-list V4-VULTR {
     rule 10 {
         action permit
         prefix 10.100.0.0/24
     }
     rule 20 {
         action deny
         le 32
         prefix 0.0.0.0/0
     }
 }
It’s also important to note, this server is only advertising 10.100.0.0/24. Meaning you could advertise 10.100.1-3.0/24 on other hosts or locations, and aggregate at the VPS.
Once complete, the BGP session should pop up and you should see via advertised-routes:
[email protected]:~$ show ip bgp neighbors 172.27.114.1 advertised-routes
BGP table version is 19601, local router ID is 10.0.20.254, vrf id 0
Default local pref 100, local AS 64537
Status codes:  s suppressed, d damped, h history, * valid, > best, = multipath,
               i internal, r RIB-failure, S Stale, R Removed
Nexthop codes: @NNN nexthop's vrf id, < announce-nh-self
Origin codes:  i - IGP, e - EGP, ? - incomplete

   Network          Next Hop            Metric LocPrf Weight Path
*> 10.100.0.0/24   0.0.0.0                  0    100  32768 i

Total number of prefixes 1
[email protected]:~$
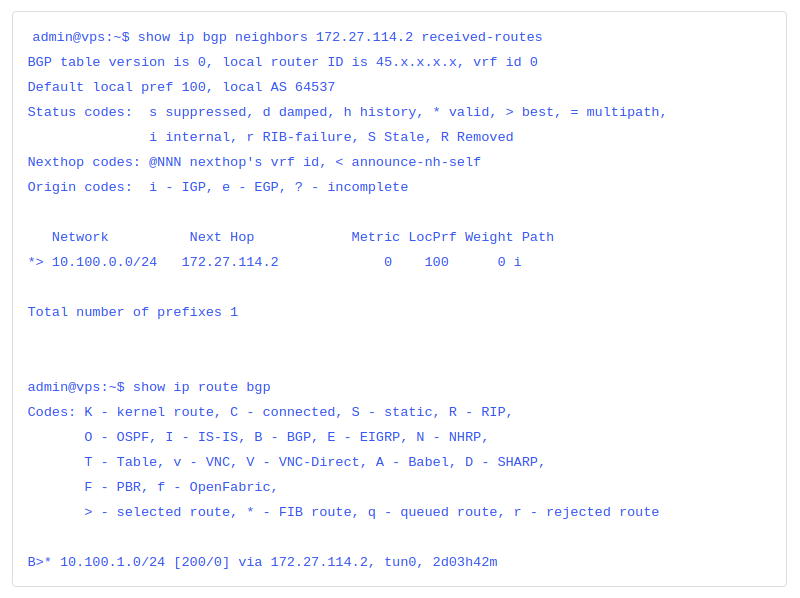
and on the VPS via received-routes and the show ip route bgp
[email protected]:~$ show ip bgp neighbors 172.27.114.2 received-routes
BGP table version is 0, local router ID is 45.x.x.x.x, vrf id 0
Default local pref 100, local AS 64537
Status codes:  s suppressed, d damped, h history, * valid, > best, = multipath,
               i internal, r RIB-failure, S Stale, R Removed
Nexthop codes: @NNN nexthop's vrf id, < announce-nh-self
Origin codes:  i - IGP, e - EGP, ? - incomplete

   Network          Next Hop            Metric LocPrf Weight Path
*> 10.100.0.0/24   172.27.114.2             0    100      0 i

Total number of prefixes 1


[email protected]:~$ show ip route bgp
Codes: K - kernel route, C - connected, S - static, R - RIP,
       O - OSPF, I - IS-IS, B - BGP, E - EIGRP, N - NHRP,
       T - Table, v - VNC, V - VNC-Direct, A - Babel, D - SHARP,
       F - PBR, f - OpenFabric,
       > - selected route, * - FIB route, q - queued route, r - rejected route

B>* 10.100.1.0/24 [200/0] via 172.27.114.2, tun0, 2d03h42m
Once all this happens, your subnet should be available from the external world! At this point you can assign a static host on like 10.100.1.100/24, or set up DHCP for that subnet.
Conclusion
Of course this is VERY quick and dirty. There is plenty of room for improvement, and more importantly, needing things like appropriate firewalls, and potentially more routing.
So where do you go from here? Of course you don’t have to use BGP just for announcing a subnet. You could just it just for distributing private subnets dynamically locally or across geographically diverse sites. Much of the BGP that happens on my local network, doesn’t even leave my edge.
Hopefully this write-up gave you a good head start though.