Since I began my HomeLab journey, I’ve virtualized and de-virtualized FreeNAS a few times. FreeNAS has backup and restore functionality, so it should be easy right?
Where it was highly discouraged before, virtualized FreeNAS has been officially supported for a number of versions now. The caveat is that you pass through the storage controller using VT-d, so FreeNAS can access the hard drives directly instead of through some virtual layer.
Unfortunately, I always found this to be less than performant. I’ve never been able to pin down the problem, but with virtualized FreeNAS, my drives and network are always INCREDIBLY slow, despite following all the best practices and tweaks.
This was a VMotion of a VM after SIX HOURS.

That was the final straw. It was time to bare-metal my FreeNAS install again. I was expecting MONSTER performance after my storage rebuild, but it was taking 6+ hours to VMotion a 60 gigabyte VM and not even get to 50%.
Learning from my mistakes
Each time I’ve migrated FreeNAS before, rather than try and keep the same configuration, I just installed fresh and reconfigured everything from scratch. My storage config is reasonably simple, so getting back up and running usually only takes a few minutes.
One thing I learned from these migrations is that it’s VERY easy to lose the contents of the iSCSI ZVOL. I think it was a test of the FreeNAS 10 Beta that insisted on formatting the ZVOL instead of just using the existing one. I don’t necessarily think I lost anything important, but I was left annoyed after that. Admittedly, it’s a beta or I might have just clicked an option incorrectly.
For safety’s sake, after that experience, I started VMotioning my VMs from iSCSI to NFS temporarily when I was re-doing my storage, since I knew the actual underlying ZPOOL is always safe. But with craptacular VMotion speeds like I was seeing, it was going take the better part of a month to complete that process.
Backing up and Restoring
When I discovered the following options in the FreeNAS menu, I figured my migration from virtualized to bare-metal was going to be an easy one.

My confidence was enhanced as I had just done something similar while moving my Unifi Controller from a VM to a physical CloudKey. Moving the controller took a grand total of about 20 seconds of uploading and downloading, so I was hoping FreeNAS would be the same.
Murphy’s Law
Simple plan right?
- Backup FreeNAS
- Reinstall FreeNAS on bare-metal
- Restore FreeNAS
- Profit??
Nothing is EVER that simple for me. My grandfather was a Murphy and I seem to live and die by that particular “law”.
Upon rebooting after the install, I was presented with a message that said getty repeating too quickly on port:

That screen was scrolling and repeating faster than I could read it. And the server didn’t have any network access.
A quick keystroke to change TTYs and I was logged into my FreeNAS system. After some poking around, it appeared none of the the other FreeNAS services, like the web interface, were running. The culprit was the lack of networking.
The problem was that my network interfaces changed. Instead of “vmx0/vmx1”, which are virtual devices provided by ESXi, I had “ix0/igb0”, which are the physical Intel gigabit and 10 gigabit ports on that server.
The spot on the console menu where it was displaying the getty repeating error is where normally FreeNAS displays the IP address. Because the server didn’t have any network access, there was nothing to display, so the Console menu was crashing and restarting over and over again.
The “Simple” Fix
Not having network access seems like it should be a simple fix right? All I really needed to do is get the Console setup menu to to stop crashing so I could reconfigure the network interfaces.
It’s FreeBSD, so putting manual network information in /etc/rc.conf should be a quick solution? Nope, FreeNAS was overwriting that. Manually setting up the network interface should have been an option too:
ifconfig ix0 ip 10.0.1.10
No dice there either. Sure, the networking worked and I was then able to ssh into the server, but the menu was still crashing.
As I learned after some more research, the Console menu is just a Python script. This script, instead of reading from the underlying FreeBSD system, accesses all data from the internal database.
Now I know just enough about Python to be dangerous, so I wasted about an hour trying to figure out how to short circuit the “Configure network interfaces” menu option. I believe I got reasonably close to a solution there, but then I crashed my system by corrupting the system database.
The actual simple fix
At that point, I was getting a little nervous. I hadn’t migrated off ANY of the VMs on the iSCSI ZVOL and there was no way I could risk wiping it. And I had wasted enough time that I didn’t want to just give up and reboot into the ESX instance on that server.
After some reading, I realized FreeNAS stored its config in an SQLite3 database, and the original backup file I downloaded was a copy of that database.
So I downloaded an SQLite database browser on the laptop, and pointed it at the backup file (of course making a copy of the file first!).

And there it was. The only place in the whole database that mentioned vmx0/vmx1. So I changed those two database columns to my new interface names.
There’s a great thing about FreeNAS in case you weren’t aware. It makes snapshots of the root filesystem, so if you made a change or update and it breaks something, you can start up the old system just by selecting an option in the boot menu.
So instead of re-installing FreeNAS to get back to a workable state, I rebooted again, choosing the initial install boot snapshot. Once it was up, restored the now-edited backup file one more time.
SUCCESS
FreeNAS started up, with all of my configuration options in place. From poking around, nothing else seemed to be broken, other than it was still trying to load the VMWare client.
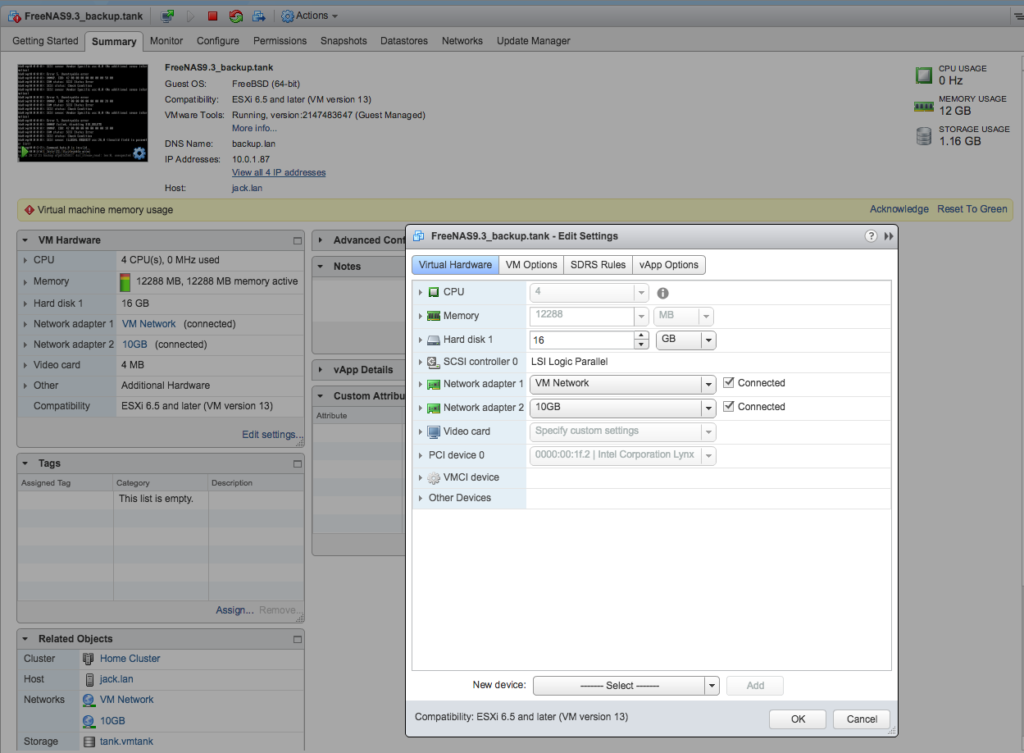
Best of all, my VMotions and file copies were fast again. REALLY fast :

After this migration I still have a virtualized FreeNAS instance, but it’s only my backup array.
Post-mortem
It’s hard for me to believe this should be acceptable behavior in the backup/restore process. But I reported this over at the FreeNAS forums — which, btw, they are as friendly as ever — and was essentially told I was wrong.
Had I just directly edited my backup database to begin with, I could have saved myself a few hours. The install and migration would have been less than a 10 minute process.
The backup and restore process of limited utility if you ever had to replace failed hardware and weren’t using identical components. It’s a bit silly that the console menu actually crashes, instead of doing something useful like say “Hey, I see your network interfaces are invalid, why don’t you hit #1 to set one up”.
Of course this is in FreeNAS 9.3.1 and I know that 10 is around the corner. Maybe the final FreeNAS 10 will be better.
In any case, hopefully this will save someone some time in the future.