I think anybody that’s ever used a Mikrotik and RouterOS can probably agree. That tiny company from Latvia does things a bit… different.
Since October of 2017, I’ve been fighting with RouterOS and switching. Well, not constantly, but it’s something that I keep finding reasons to try and hash out. A few days ago, thanks to a one or two sentence post on Reddit, I finally figured it out.
Back in October 2017, I picked up a CRS317-1G-16S+RM. This is Mikrotik’s 16 port SFP+ switch with a single gigabit port, ostenibly for management. Around that time, I also started using a CCR (Cloud Core Router) for my main edge device.
My requirements were fairly simple:
- More than 12 SFP+ ports
- 10Gb
- Ability to use VLANs
I wasn’t worried about any layer 3 capabilities on the switch (at the time), so it didn’t bother me at all that while the CRS317 was capable of being a full layer 3 switch, it couldn’t do it at anywhere near line-rate.
Cloud Core Router
The CCR went in without a hitch. As mentioned, Mikrotik likes to do things a little differently. But there’s a certain logic to the config, especially if you’ve ever done any CLI work on something like a Cisco.
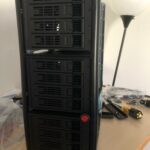
A recent photo of the CCR (cabling disaster included):

For routing, I’ll say I absolutely adore Mikrotik and RouterOS. I have even started replacing some of my VPSs with CHRs, just because it works so well.
Cloud Router Switch
Switching on the other hand is a disaster, and for almost a month when I first had the CRS317, I was unable to even use the switch.
With a CRS (Cloud Router Switch), there are two options. RouterOS, which gives you full layer 3 capabilites, but potentially sacrifices line-rate speeds if you try and use any routing features, or SwOS, which turns the switch into an almost too-dumb managed switch that only supports LAGs, VLANs, RSTP, and not much else.
The problem was three-fold:
- The default SwOS firmware (2.3p) on the switch resulted in a SwOS bootloop.
- The available firmware (2.5) at the time broke DHCP on any VLANs the switch could see.
- Trying to figure RouterOS switching (especially in the pre-6.41 RouterOS versions) was probably one of the first IT related things in a long time that I would honestly say “defeated” me.
Until Mikrotik released SwOS version 2.6, around mid-November, the switch was as good as a brick, at least to me.
Fast forward some months and once again I was looking to get RouterOS running on my CRS317. The reasons were simple. My RouterOS knowledge had grown exponentially through my machinations on the CCR, and it constantly bugged me that RouterOS on the CRS had defeated me. Not to mentioned my interest in networking concepts has evolved and I wanted to use some non-router-y layer 3 features, like DHCP Relay.
It helped that the current RouterOS versions have attempted to clean up the switching config. I say “attempted” because it’s still a bit of a mess, but the bridging system is at least a SMALL measure of improvement over the old master-port config. Unfortunately, like any transition, it doesn’t help that the documentation is a bit hard to follow as it’s a mix of the old and new ways to handle things.
Unfortunately, as the CRS317 is my core switch, I was only able to schedule an hour or two of downtime every other week. This was not enough time for me to be able to figure it out, not to mention formulate the correct questions to be asking after a failed attempt. I had posted some inqueries on a few subreddits and at the Mikrotik forums without much luck.
I’ve got quite a bit of experience with Cisco and Dell networking, and have no problem setting up a Cisco L2/L3 switch in a few minutes via a serial cable, but this stupid Mikrotik switch was killing me. And a some queries to a few regulars that have mentioned they also have these switches told me I wasn’t the only one finding it difficult.
The standard response was clear. Just stick with SwOS.
Putting it all together
As the weeks passed, I became more and more frantic. Once again this stupid switch was defeating me. I knew I was close, but every time I thought I had it, my whole network went down. It turns out that at least part of my problems was because of some dumb RSTP bug on my Netgear switch.
Ultimately, I think that last item, the RSTP bug, was the cause of most of my headaches. I probably had a working config on more than one occasion, but because the bug knocked down my entire network, I really had no way of knowing.
I also believe this problem was exacerbated by the fact that I think it’s easy to create forwarding loops with the VLAN filtering that’s present on the Mikrotik switches.
I have absolutely no idea why I did it with all the problems I was having, but when the opportunity to buy a CRS326-24G-2S+RM for less than $150 arose, I jumped on it.
With a separate switch, and a handful of hours, I was finally able to get it working.
RouterOS, Switching and VLANs!
First off, per the following chart, unless you have a CRS3xx, it’s probably not worth running RouterOS, at least at this time. The CRS1xx/2xx disable hardware offload (and therefore line-rate) with just using some otherwise basic features.

I’m also going to assume a basic working knowledge of how to navigate RouterOS. Anybody that’s ever done a CLI on a Cisco can probably hammer it out because it’s easy to just
Nitty Gritty
I would highly recommend doing most of this via a serial cable. It is VERY easy to lock yourself out of these things because of the confusing way they handle VLANs.
With the serial cable, you can reboot and navigate the menus to choose RouterOS as the default boot OS (push a key in the first few seconds).
The first step is to ensure you are running the most recent RouterOS version, 6.42.1 at the time of this writing. To check the version:
/system resource print
If not the current version, you can download the most recent version from MikroTik and drop it in the /files. A simple reboot will execute the upgrade. If you get the switch online, you can also upgrade from the GUI or WinBox.
Once you have the current RouterOS version installed, it’s a good idea to upgrade RouterBOARD too (the boot firmware). I would also recommend enabling the ipv6 package, which for some silly reason, isn’t by default.
/system package enable ipv6,/system routerboard upgradeand/system reboot
At this point, you should be on the latest version of everything.
I would recommend a system configuration reset, simply because especially if you are coming from a pre-6.41 version, the migration from master-port to bridge is a bit ugly, at least in how it names things.
/system reset-configurationand ignore the “dangerous” warning.
Default Config
After the switch reboots, and you login (user: admin, no password), it will ask you to either accept or undo the default configuration. I would accept it.
The default configuration isn’t bad as it handles some of the tedium for you, setting up a bridge and dropping all the ports on it. It also gives the switch a default IP of 192.168.88.1/24 on the bridge (every port), so you could potentially give yourself an IP on that subnet and continue to configure the switch over the network.
You can view the default config with /export
Start Customizing
The default IP is usually the first thing I remove. My network is on 10.0.0.0/8, and as mentioned above, it’s way too easy to lock yourself out of the switch with a simple misconfiguration. So removing it is as simple as:
/ip address print– Shows a list of IPs and interfaces they are assigned/ip address remove 0– Remove the number. In the following example,10.254.1.248/24would be removed. You can use the aboveprintcommand afterwards to verify its removal.

Next, I set up any LAGs I need. To do this, you need to remove the ports from the bridge so they can be used in a LAG:
/interface bridge port print– Show all the ports on the main bridge./interface bridge port remove 0,1– Assuming I wanted to put ether1 and ether2 in a LAG in the following example:

And then dropping them in a LAG:
/interface bonding add mode=802.3ad name=BOND-ToOtherSwitch slaves=ether1,ether2 transmit-hash-policy=layer-3-and-4
Finally, add the new LAG interface back to the bridge:
/interface bridge port add bridge=bridge interface=BOND-ToOtherSwitch
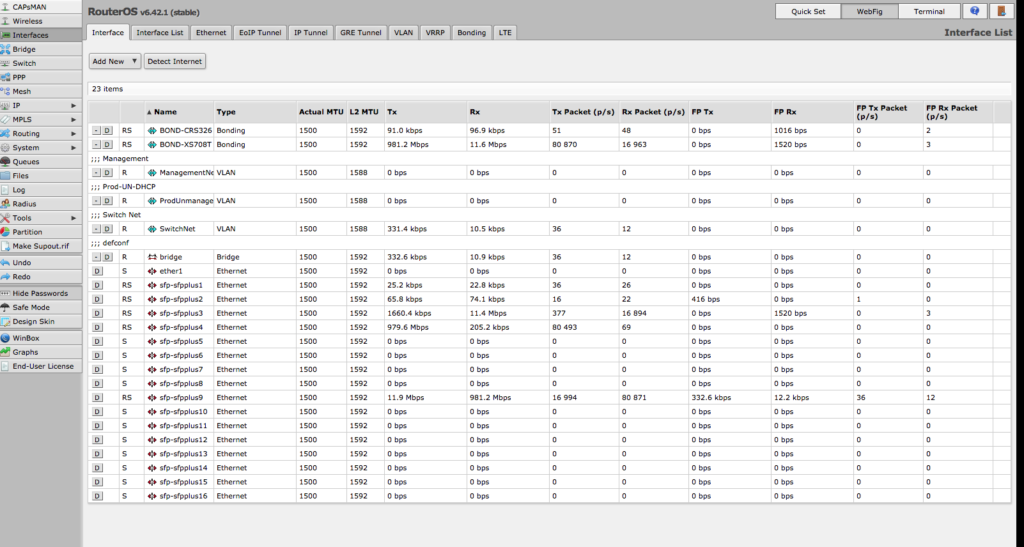
Hopefully, when you do a /interface bridge port print to view the config, you see something like this:

The “H” next to the interface name means it’s hardware accelerated and will go line-rate, also designated by HW=Yes in the same output of print.

Something else to do now is to ensure that RSTP is enabled on the bridge. There might be a bug in RouterOS where the bridge refuses to pass traffic if it’s not. I’m not sure if that’s the case but it’s something that someone mentioned in a post and I’m going to take them at their word because of all the problems I’ve had.
/interface bridge print/interface bridge set 0 protocol-mode=rstp– The0matches the ID from theprint

Switch Management
The next step is to get the switch available on the network, or even able to contact the Internet (for easy updating).
I have separate VLANs for things, but you could easily just put the IP on the bridge too. I’m going to focus on the former since VLANs are really where these switches are a pain.
Anybody that’s set up a Cisco is well familiar with these steps:
/interface vlan add comment=Management interface=bridge name=ManagementNet vlan-id=50– Add a management interface on VLAN50/interface vlan add comment="SwitchNet" interface=bridge name=SwitchNet vlan-id=254– Add an interface that can route. Even if you aren’t doing any routing specifically on the switch, this is how the switch would access the Internet (mostly for updating)./ip dns set servers=10.3.1.253,10.3.1.254– Add some DNS servers/ip route add distance=1 gateway=10.254.1.1– Add the default route for the switch.
As you can probably tell, SwitchNet is interface this switch uses to get out to the Internet. As before, an /interface vlan print will show verify that the interfaces were created:

Success!
So yay! The switch should be working and passing VLANs. It should also be accessible via any SVIs you set.
So you’d think that would enough right? Well only if you don’t care about any VLAN filtering.
I have a fairly simple setup from that perspective and I’m not doing much in the way of VLAN enforcement. Unfortunately, that also includes having a port act as a traditional “access” port.
So all the aggravation I’ve felt over many months is to handle something that would be handled on a Cisco in two lines:
switchport mode accessswitchport access vlan 5
VLAN Filtering
This is really where RouterOS switching gets ugly. Or at least annoying, especially trying to figure out where things belong with the bridge, bonds, ports and VLAN interfaces.
In this case, I think it’s more useful to take a look at the output of /interface bridge vlan export, which is the raw commands, instead of the output of /interface bridge vlan print, which can include some dynamic stuff, INCLUDING THE VLANS THAT AREN’T WORKING!!!.
That last sentence is what makes it somewhat confusing. It can help you troubleshoot to a point if something isn’t working, but largely you’ll just stare at it and go “Well the interface is there, why isn’t it working?!”
The first step here is to set the pvid on the ports on the bridge /interface bridge port print:

And setting the pvid with /interface bridge port set 8,9,10,11 pvid=21 and validating with /interface bridge port print from=[/interface bridge port find pvid=21]:

VLAN Filtering #2
Unfortunately, despite setting the pvid, nothing actually happens in this setup without more extensive VLAN filtering. The switch is just still rather dumbly passing VLANs.

Let’s talk a bit about what’s going on here:
- Tag VLAN21 on the two LAGs,
- a few other ports on the switch (they are trunks for virtualization hosts,
- and the bridge. That last piece of information about the bridge is important for later.
/interface bridge vlan add bridge=bridge tagged=BOND-CRS317,BOND-UNIFIPOE,bridge,ether17,ether18,ether19,ether20,ether21,ether22 untagged=ether9,ether10,ether11,ether12 vlan-ids=21
- The default VLAN1 is untagged on the LAGs,
- the same trunk ports untagged from the first filter-set,
- and a few ports which will be ACCESS ports on the default VLAN. This is necessary as I haven’t completely my migration off the default VLAN yet for a few things.
/interface bridge vlan add bridge=bridge untagged=BOND-CRS317,BOND-UNIFIPOE,ether17,ether18,ether19,ether20,ether21,ether22,ether1,ether2,ether3,ether4,ether5,ether6,ether7,ether8 vlan-ids=1
- Tag my other vlans on all the ports. These aren’t untagged anywhere on this switch.
/interface bridge vlan add bridge=bridge tagged=BOND-CRS317,BOND-UNIFIPOE,ether17,ether18,ether19,ether20,ether21,ether22 vlan-ids=2,3,4,6,7,8,9,20,22,42,77,100,146,253
- Finally, tag two more VLANs to the LAGs to the bridge (important again here). This is for my Management and default route VLANs. I COULD combine this with the above, so above it would just be
vlan_ids=2,3,4,5,6,7,8,9,20,22,42,77,100,146,253,254. It’s broken out here as that’s how I built it out as I was testing and it worked.
/interface bridge vlan add bridge=bridge tagged=BOND-CRS317,BOND-UNIFIPOE,bridge vlan-ids=50,254
The Coup de Grâce
And these are where I kept coming up short:
tagged=BOND-CRS317,BOND-UNIFIPOE,bridge
The bridge itself must be tagged whenever the associated VLAN is an SVI/accessible IP for the switch itself.
So without VLAN21/50/254 having the bridge tagged on themselves, the switch will block any attempts to contact it over associated IPs.
This was causing me a tremendous headache as I was trying to tag/untag the VLAN interfaces themselves, instead of the bridge, because that’s how literally every other port/interface on the switch works. Not to mention that I believe you can accidentally create an internal forwarding loop depending on how you place the bridge on the filters.
Finally, turning on VLAN filtering activates this all, and hopefully doesn’t lock you out of the switch:
/interface bridge set 0 vlan-filtering=yes– again, the0here would be the number of the bridge from a/interface bridge print
The Postmortum
Assuming everything went well, the switch should be passing traffic, the access ports should be acting like access ports, and the switch should be responding and accessible on its SVIs.
I’m using it as a dhcp relay:
/ip dhcp-relay add dhcp-server=10.254.1.1 disabled=no interface=ProdUnmanaged local-address=10.21.21.249 name=prod-unmanaged-relay
Enabled neighbor discovery:
/ip neighbor discovery-settings set discover-interface-list=all
Disabled all the unnecessary services:
/ip service
set telnet disabled=yes
set ftp disabled=yes
set ssh port=22222
set api disabled=yes
set winbox disabled=yes
set api-ssl disabled=yes
Set up SSH key based authentication (honestly this alone might have been enough reason for me to do this) :

And pointed a few gateways at the switch for routing where I don’t need or care about wire-speed routing.
So I’ve finally got it all working. I’ve only been working on it since October. The feeling when I enabled VLAN filtering again (for the umpteenth time) and everything still worked??

Maybe someday they will release a switch that can do line-rate routing. Hopefully by then they also will have cleaned up how the VLANs are handled a bit more as this is still a bit confusing.
In conclusion, I actually really like this hardware. I know some people would never buy white hardware, but I really appreciate the asthetic
I’m even considering buying a few more Mikrotik switches (and am fully regretting a few recent EdgeSwitch purchases). Not to mention I have a US-8 and US-8-150W I’d love to replace.